27mm and 30.2mm pistons in the Blue/gold/silver spots (14mm master) and
30mm and 34mm on the Brembos and why you need a larger (5/8th) M/C for them
What did you do today? Cobba's rebuild
Moderators: trixynut, Mincehead, dicky, phuk72, Jak, Kevtrx849
-
cobbadiggabuddyblooo
- Site Sponsor
- Posts: 6809
- Joined: Thu Aug 28, 2008 9:19 am
- Location: Brisbane,Australia
Re: What did you do today? Cobba's rebuild
laughter is the best medicine
-
dandywarhol

- Site Sponsor
- Posts: 1639
- Joined: Fri Nov 24, 2006 12:56 pm
- Location: Edinburgh, Scotland
Re: What did you do today? Cobba's rebuild
cobbadiggabuddyblooo wrote:Good tutorial on radial master cylinders and the way they work in relation to their numbers too.. Eg ..19x18 -19x20
http://www.oppracing.com/pages/articles ... cylinders/
The following models are listed as having ø14mm bore/piston master cylinders:
Yamaha
XJR1300SP('99) (EU)
YZF-R1('98-'99)(EU)
YZF1000R Thunder Ace('96-'99)
YZF-R7('99)(EU)
YZF-R6('99-'99)
YZF600R Thunder Cat('97-'99)
FZS600('99)
Diversion 600('92)
SRX600('87-'97)
SR500('78-'84)
Diversion 400('91)
XJ400/E/D('80-'81)
SRX400('87-'99)
SR400('78-'84)
RD400('76)
ZEAL 250('91-'94)
FZR250('86-'88)
TZR250('86-'88)
RZ250('81-'82)
TDR250('88)
SRV250/S('92-'96)
TZR125('87-'94)
Honda
X-4('97-'99)
CBR1000F('89-'92)
CB1000SF/T2('92-'97)
VTR1000F('97-'99)
PC800('90)
NR750(RC40)('92)
CBR600F('86-'90)
BROS600('88-'90)
CB400SF('92-'98)
CB400SF Vr-S('96)
CB400SF Vr-R('95)
CB400Four('97-'99)
CBR400RR('90-'99)
CBR400R('86-'87)
BROS400('88-'90)
RVF400(NC35)('94-'99)
VFR400(NC30)('89-'93)
VFR400R Pro Arm('88)
VFR400R/Z('86-'87)
CBR250RR('90-'99)
CBR250F Hurricane('87)
NSR250R('88-'99)
CB125T('84-'90)
Suzuki
GSXR-1100('89-'92)
GSX1100F('88)
TL1000S('97-'99)
GSF750('96-'99)
GSXR-750W('92-'94)
GSXR-750('88-'91)
GSX750E('80-'83)
RG500r('85-'87)
GSX-400R('86-'87)
GSX400X Impulse('86)
RG400r('85-'87)
GSX400F('81-'83)
GT380('72-'78)
GSX-250R('87-'89)
GF250/S('85-'86)
RGV-250r('96-'99)
RG250r('85-'87)
Kawasaki
Z900 SuperFour('72-'75)
Z750RS('73-'75)
ZEPHYR 400x('96)
Xanzas('92)
ZXR400/R('91-'99)
ZX-4('88)
GPZ400R('87)
GPZ400R('85-'88)
FX400r('85-'87)
GPZ400F/FII('83-'85)
Z400GP('82)
Z400FX(W-DISK)('79-'82)
EX-4('94-'95)
Eliminator 400(C1/CX)('88-'89)
Eliminator 400('89-'90)
ZXR250('89-'99)
GPZ250RII('88)
KR-1('88)
KR250/S('84-'85)
Update 4 Dec, 5:30pm
Triumph
TT600
Sprint ST
Although they're all 14mm bore, watch for reservoir capacity - some of these m/c are for single discs
1996 TRX 850, blue, Ohlins 46HRCLS, Race Tech Gold Valves, 0.90 springs, Venom pipes, R6 brakes............
1974 Yamaha RD250A, Candy Blue
1998 Yamaha SZR660, blue of course
1967 Yamaha TD1C 250, Blue and white
1974 Yamaha RD250A, Candy Blue
1998 Yamaha SZR660, blue of course
1967 Yamaha TD1C 250, Blue and white
-
Rod.s

- Site Sponsor
- Posts: 1406
- Joined: Sun Apr 25, 2010 11:01 am
- Location: Brisbane, Australia
Re: What did you do today? Cobba's rebuild
Read this and found it has some conflicting info, but if you ignore paragraph on manufacturing! It's great additional infocobbadiggabuddyblooo wrote:Good tutorial on radial master cylinders and the way they work in relation to their numbers too.. Eg ..19x18 -19x20
http://www.oppracing.com/pages/articles ... cylinders/
If it's not made in China, it's a fake!
-
cobbadiggabuddyblooo
- Site Sponsor
- Posts: 6809
- Joined: Thu Aug 28, 2008 9:19 am
- Location: Brisbane,Australia
Re: What did you do today? Cobba's rebuild
You mean about Yamaha R1 using a 16mm RADIAL master as std and 14mm axial???? on models up to 07
laughter is the best medicine
-
cobbadiggabuddyblooo
- Site Sponsor
- Posts: 6809
- Joined: Thu Aug 28, 2008 9:19 am
- Location: Brisbane,Australia
Re: What did you do today? Cobba's rebuild
A little research on managing temperatures of late and I came across this on radiators.
http://www.arrowheadradiator.com/14_rul ... obiles.htm
http://www.arrowheadradiator.com/14_rul ... obiles.htm
laughter is the best medicine
-
cobbadiggabuddyblooo
- Site Sponsor
- Posts: 6809
- Joined: Thu Aug 28, 2008 9:19 am
- Location: Brisbane,Australia
Re: What did you do today? Cobba's rebuild
GROUNDHOG DAY 
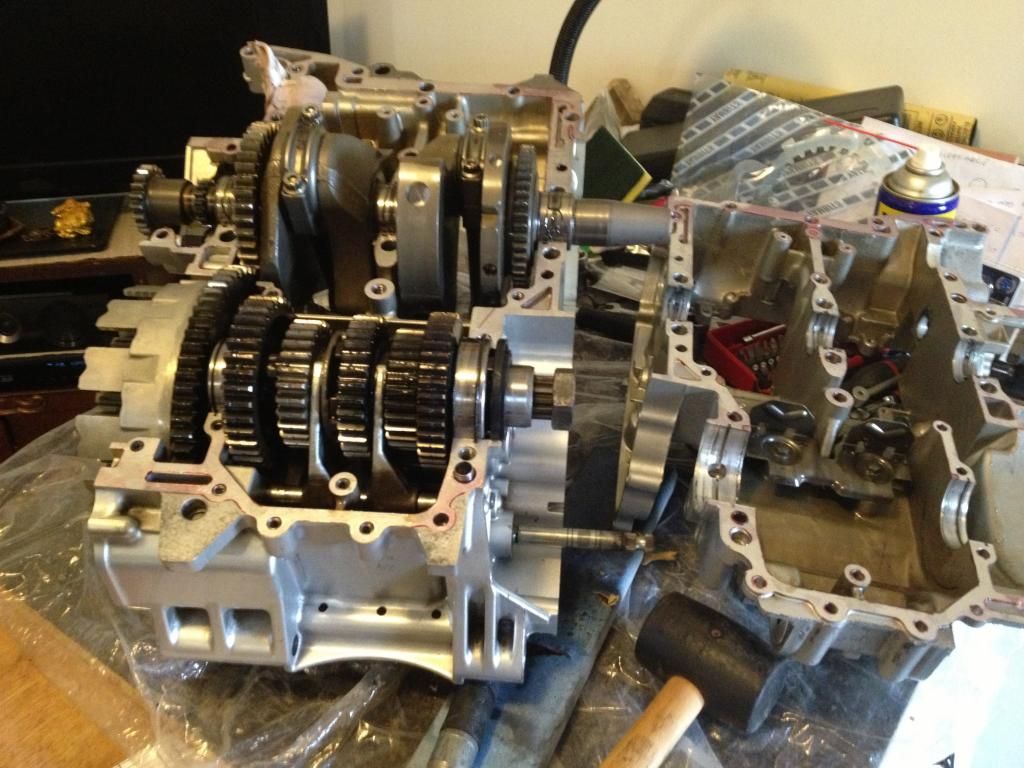
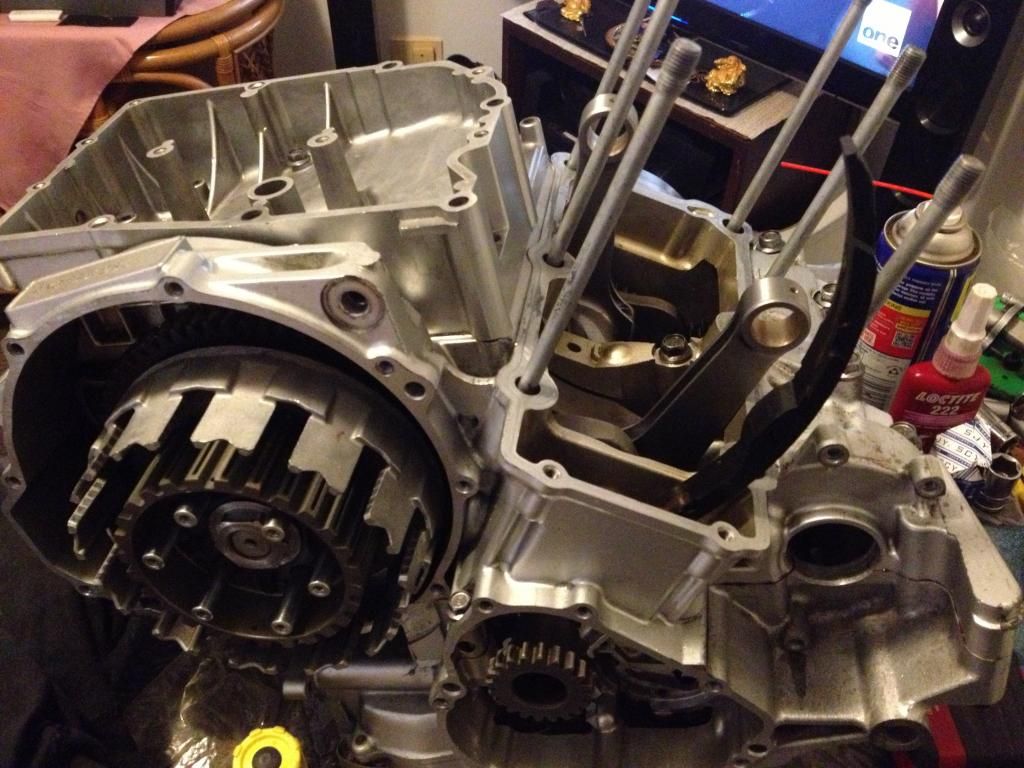
Took about 1 Hr to remove the rotor, take out both balance shafts and split the cases and remove the crank and rods.
Job was made a little easier by leaving the clutch inplace on the shaft as I don't need to access the gearbox for any reason.
As long as I don't remove the output shaft, I won't have to realign the selector forks ..
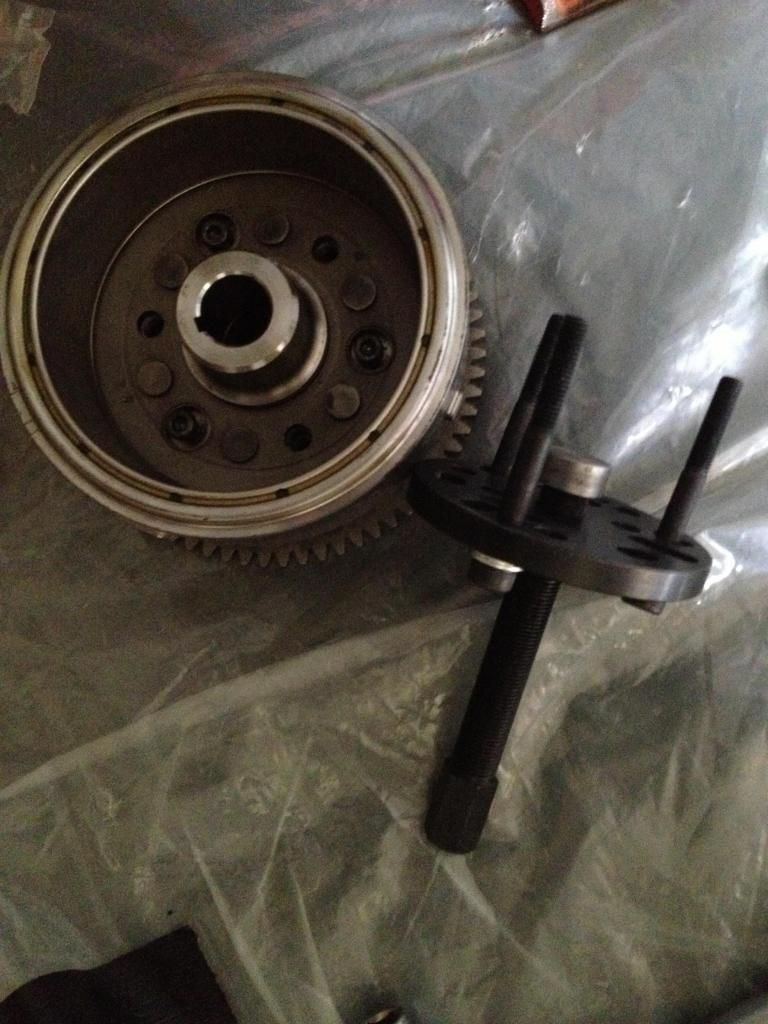
The rotor puller I purchased online I modified by making up a button to sit against the crank so when tightened there is no damage to the crank and once I locked the clutch with the clutch tool also bought, things just fell into place.

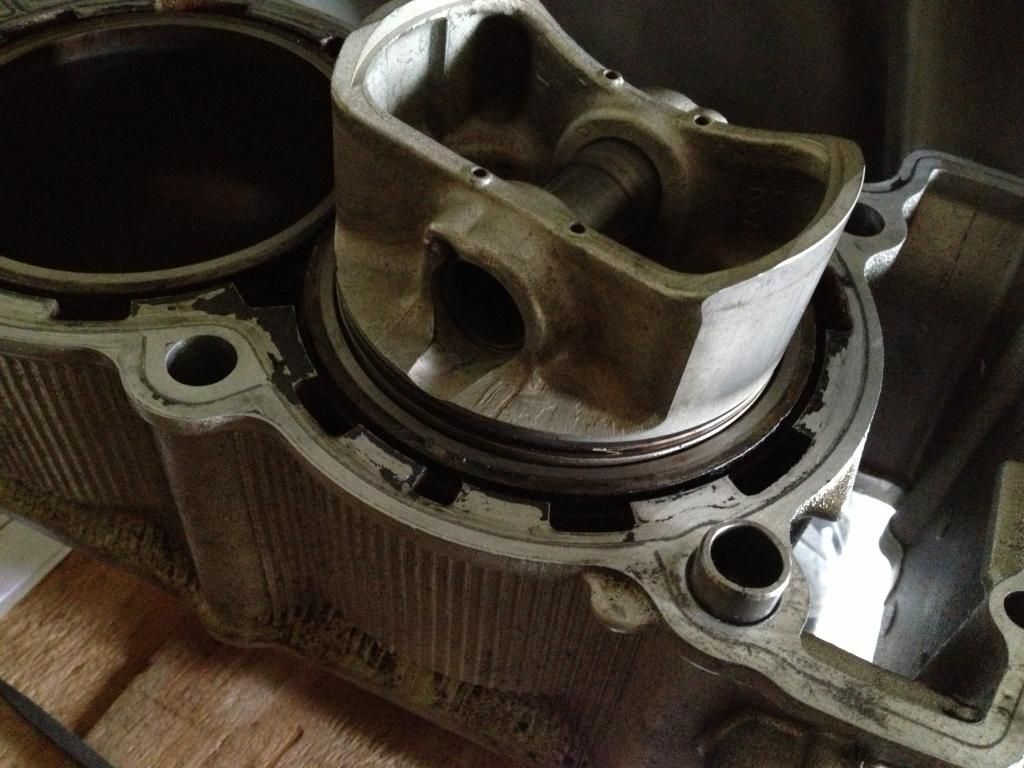
The arias pistons have been ceramic coated and I'll pick up the barrels tomorrow because the extra 0.001 ceramic coating I've had to have the bores rehoned to get me back to the 0.0025 clearance.
Then back down to Brisbane Engine Balance to have more weight removed from the crank to suit.
So busy week next week with the forks finally under way and bolting it all back together again.
A couple of hrs work this arvo and the cases are all clean with a tap run through the threads.
Gotta love the loctite used to join the cases, a quick wipe with iso alcohol so all prepped to go..
I
Took about 1 Hr to remove the rotor, take out both balance shafts and split the cases and remove the crank and rods.
Job was made a little easier by leaving the clutch inplace on the shaft as I don't need to access the gearbox for any reason.
As long as I don't remove the output shaft, I won't have to realign the selector forks ..
The rotor puller I purchased online I modified by making up a button to sit against the crank so when tightened there is no damage to the crank and once I locked the clutch with the clutch tool also bought, things just fell into place.
The arias pistons have been ceramic coated and I'll pick up the barrels tomorrow because the extra 0.001 ceramic coating I've had to have the bores rehoned to get me back to the 0.0025 clearance.
Then back down to Brisbane Engine Balance to have more weight removed from the crank to suit.
So busy week next week with the forks finally under way and bolting it all back together again.
A couple of hrs work this arvo and the cases are all clean with a tap run through the threads.
Gotta love the loctite used to join the cases, a quick wipe with iso alcohol so all prepped to go..
I
laughter is the best medicine
-
cobbadiggabuddyblooo
- Site Sponsor
- Posts: 6809
- Joined: Thu Aug 28, 2008 9:19 am
- Location: Brisbane,Australia
Re: What did you do today? Cobba's rebuild
Dropped the crank off Thursday lunch time and had a call 2 hrs later with the job complete with some of the drilled holes in the crank welded up.
Seems like more taken from around the edges of the bob weights than drilling into the crank this time.
The reason as explained drilling and taking depth from the centre doesn't effect the balance factor as much as taking from the edges due to the rotating mass and with the lighter pistons, so more rotating mass needs to be removed from the bob weights.
A bit more like a knife edging but not as radical.
Picked it back up this morning and into things this arvo and 5hrs motor is back to the stage of setting the ring gap and dialing in the cams.
Grant managed to sneak a little more weight from around the top of the Carrillo rods to aid in a little more acceleration.
Oddly enough he had another TRX crank in last week to get balanced up for a pair of JE's
Anyone from the forum ???
laughter is the best medicine
-
cobbadiggabuddyblooo
- Site Sponsor
- Posts: 6809
- Joined: Thu Aug 28, 2008 9:19 am
- Location: Brisbane,Australia
Re: What did you do today? Cobba's rebuild
Couple of hrs spent today setting the ring gap. Thanks to Alan in at Serco who gave me all the tips on doing the task.
I used another set of std barrels and rings to practice to get the feel of things to start before doing the Arias piston rings.
Once the ring is placed into the bore, place the piston on top of the rings and I use that to get the ring sitting at an even height from the top of the bore.
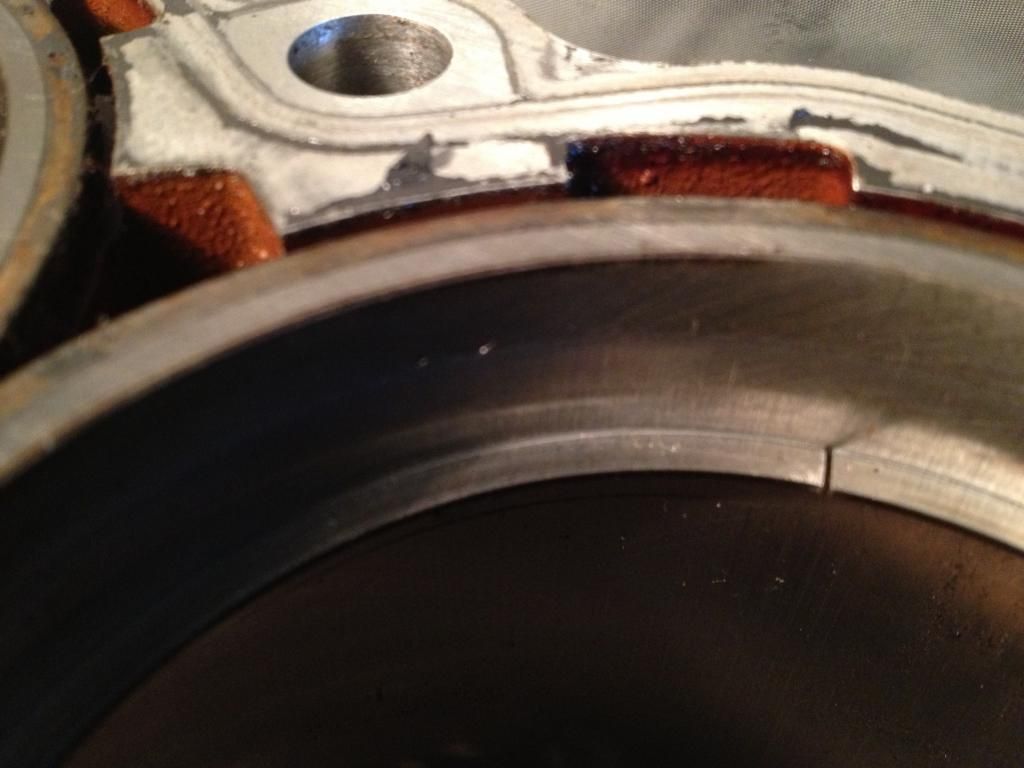
Then just a matter of using your feeler gauges to measure the gap on the rings.
As I mentioned, I measured the gap on the spare std bore barrels/rings and set myself a target gap.
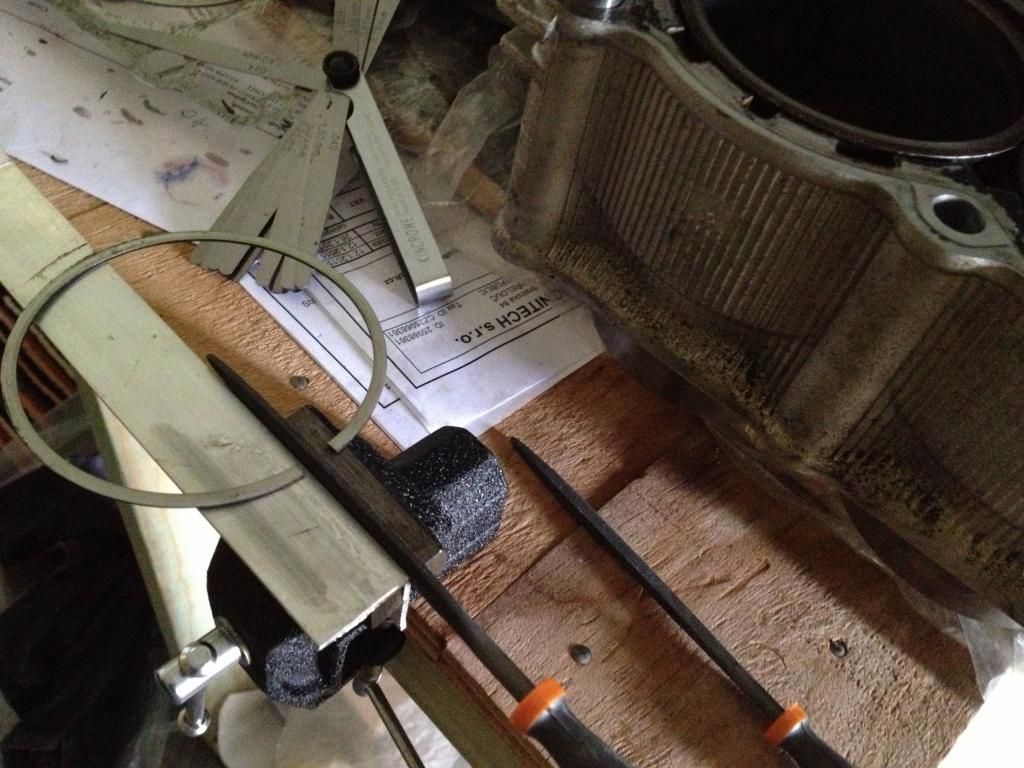
Then proceeded to file one edge to get my target all the while trying to keep the ring gap parallel.
I placed a file into the vice and set the ring with the gap between the file and worked on filing only 1 edge.
This always gives you a square edge as a reference if you only file 1 side of the ring.
Dragging the ring across the file in 1 direction only, from the outside of the ring towards the centre.
As a reference I placed the ring gap square against the file and at 180* from the gap placed a small mark with pen to give me a line to keep the ring square to the file.
Boy those top rings are manufactured with a hard material and took a little while to get use to just how much pressure I needed to actually take material off. The 2nd ring is a lot softer and it didnt take much pressure at all to start removing material from the ring. Just remember to deburr the edges before placing into the bore each time. The ring face that sits against the bore should not need to be touched due to the 1 direction used when filing. 
After a couple of hrs the job is all complete with gaps set.
TOP RING 0.018" 0.45mm
CENTRE RING 0.022" 0.55mm
oil rings 0.015" 0.38mm
Tomorrow I'll fit the pistons to the rods and get the barrels in place and work on marking the cam ends with the cam lobe centrelines so I can dial the cams.
I used another set of std barrels and rings to practice to get the feel of things to start before doing the Arias piston rings.
Once the ring is placed into the bore, place the piston on top of the rings and I use that to get the ring sitting at an even height from the top of the bore.
Then just a matter of using your feeler gauges to measure the gap on the rings.
As I mentioned, I measured the gap on the spare std bore barrels/rings and set myself a target gap.
Then proceeded to file one edge to get my target all the while trying to keep the ring gap parallel.
I placed a file into the vice and set the ring with the gap between the file and worked on filing only 1 edge.
This always gives you a square edge as a reference if you only file 1 side of the ring.
Dragging the ring across the file in 1 direction only, from the outside of the ring towards the centre.
As a reference I placed the ring gap square against the file and at 180* from the gap placed a small mark with pen to give me a line to keep the ring square to the file.
Boy those top rings are manufactured with a hard material and took a little while to get use to just how much pressure I needed to actually take material off.
After a couple of hrs the job is all complete with gaps set.
TOP RING 0.018" 0.45mm
CENTRE RING 0.022" 0.55mm
oil rings 0.015" 0.38mm
Tomorrow I'll fit the pistons to the rods and get the barrels in place and work on marking the cam ends with the cam lobe centrelines so I can dial the cams.
laughter is the best medicine
-
cobbadiggabuddyblooo
- Site Sponsor
- Posts: 6809
- Joined: Thu Aug 28, 2008 9:19 am
- Location: Brisbane,Australia
Re: What did you do today? Cobba's rebuild
Bit of an update on things.
I tried to mark the cam ends by bolting the head on offset so no.2 chamber was sitting over no.1 cylinder and the combustion chamber on no 1 was exposed hanging out over the side of the motor to give me a stable work place. Easy access to measuring 1mm valve lift directly on the head of the valve.
The only issue was with the diameter of the cam end only being around 35mm it was way too inaccurate and I could easily get a reading with a variation of 1-3 degrees.
Good idea in principle but not practical in this instance.
I've spent a number of hours trying to take readings from the cam lobes and 1st thing that needs to be remembered is the valve clearance of 0.15mm needs to be factored in to get a true reading of the 1mm of valve lift when measuring on the lobe.
Again the angle of the dial gauge in relation to the cam lobe can all place variables of a few degrees.
I feel maybe a test indicator placed right up inside and onto the bucket may be the best solution here.
laughter is the best medicine
-
cobbadiggabuddyblooo
- Site Sponsor
- Posts: 6809
- Joined: Thu Aug 28, 2008 9:19 am
- Location: Brisbane,Australia
Re: What did you do today? Cobba's rebuild
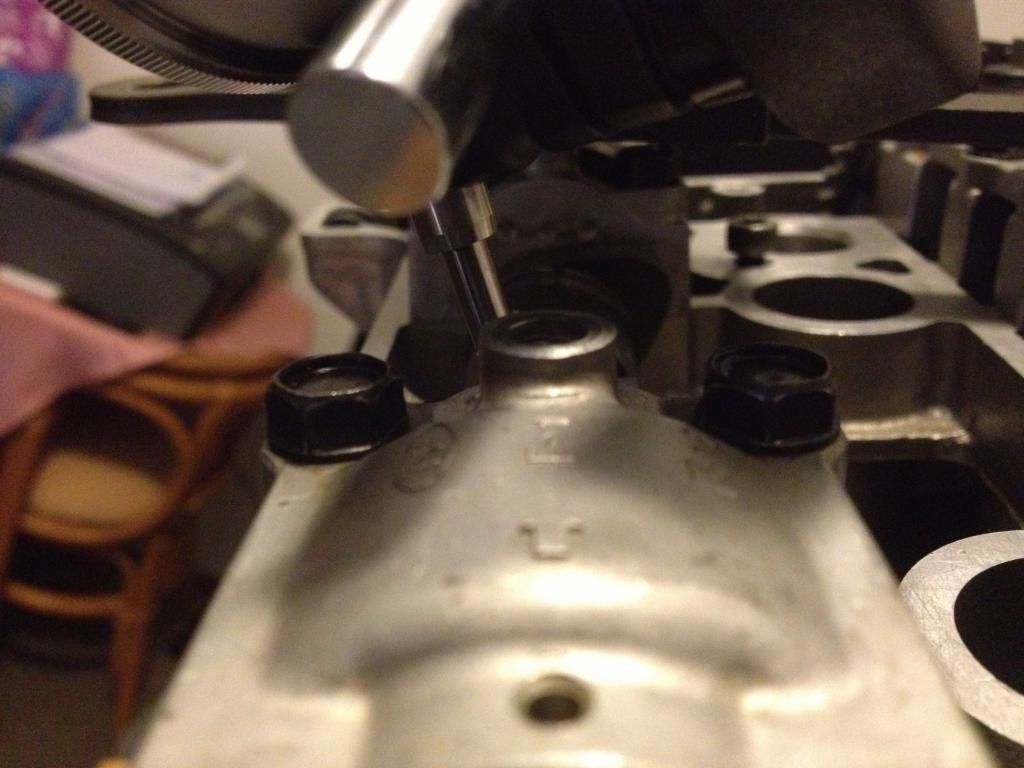
A little more tinkering tonite and by changing the angle of the dial gauge from being placed square to the cam journal cap gives me an exhaust centreline of 144*  but if I place the gauge inline with the valve stem like the photo below and take a reading I narrowed that down by 30 degrees to 114* and close to my optimum 109*
But again this is just by sight to the valve stem and no way accurate. It looks like if I really want to do this, using a test indicator upon the bucket itself will be the only true way to get a reading.
Now finding one that will be long enough to get in with very little room around the bucket and the cam/cap may be a challenge in itself too.
laughter is the best medicine
-
Rich
- Site Sponsor
- Posts: 217
- Joined: Mon Dec 23, 2013 8:20 pm
- Location: Derbyshire UK
Re: What did you do today? Cobba's rebuild
does the tip not unscrew from the dial guage so you can replace it with a peice of threaded rod?
-
cobbadiggabuddyblooo
- Site Sponsor
- Posts: 6809
- Joined: Thu Aug 28, 2008 9:19 am
- Location: Brisbane,Australia
Re: What did you do today? Cobba's rebuild
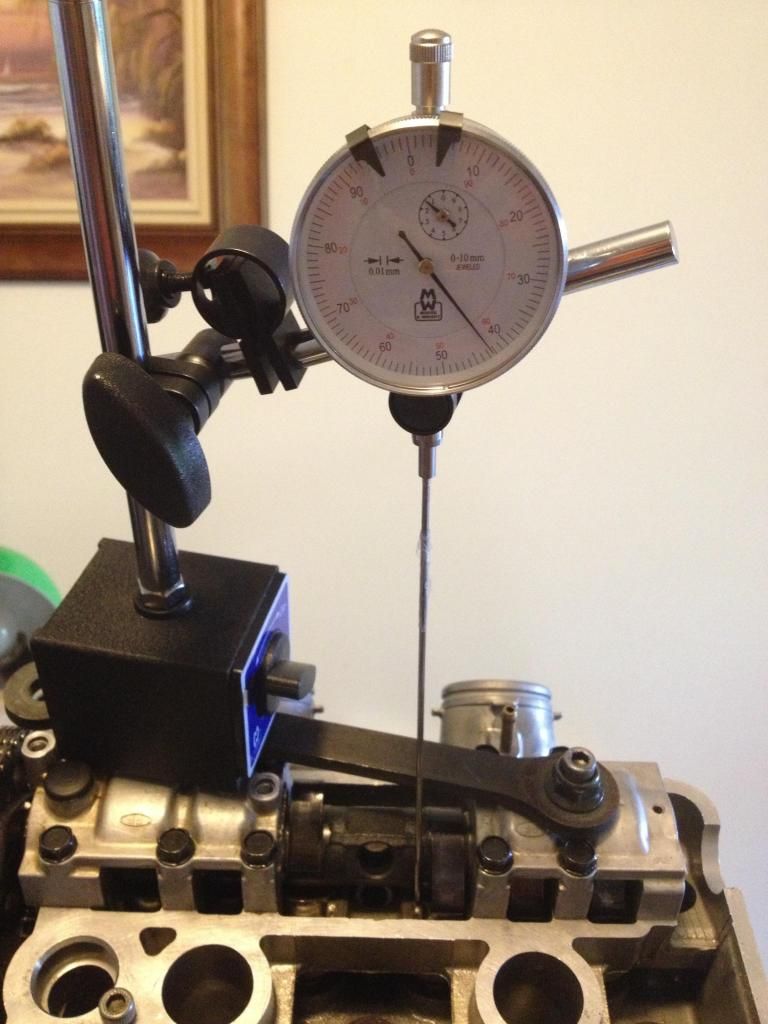
Yes and I have 1 more option I haven't tried. 
A mate made me aware that some push bike spokes are 2.5mm and same thread used on most dial gauges. Fingers crossed It may be thin enough to sneak past the cam and catch the bucket to get a reading ..
A mate made me aware that some push bike spokes are 2.5mm and same thread used on most dial gauges. Fingers crossed It may be thin enough to sneak past the cam and catch the bucket to get a reading ..
laughter is the best medicine
-
cobbadiggabuddyblooo
- Site Sponsor
- Posts: 6809
- Joined: Thu Aug 28, 2008 9:19 am
- Location: Brisbane,Australia
Re: What did you do today? Cobba's rebuild
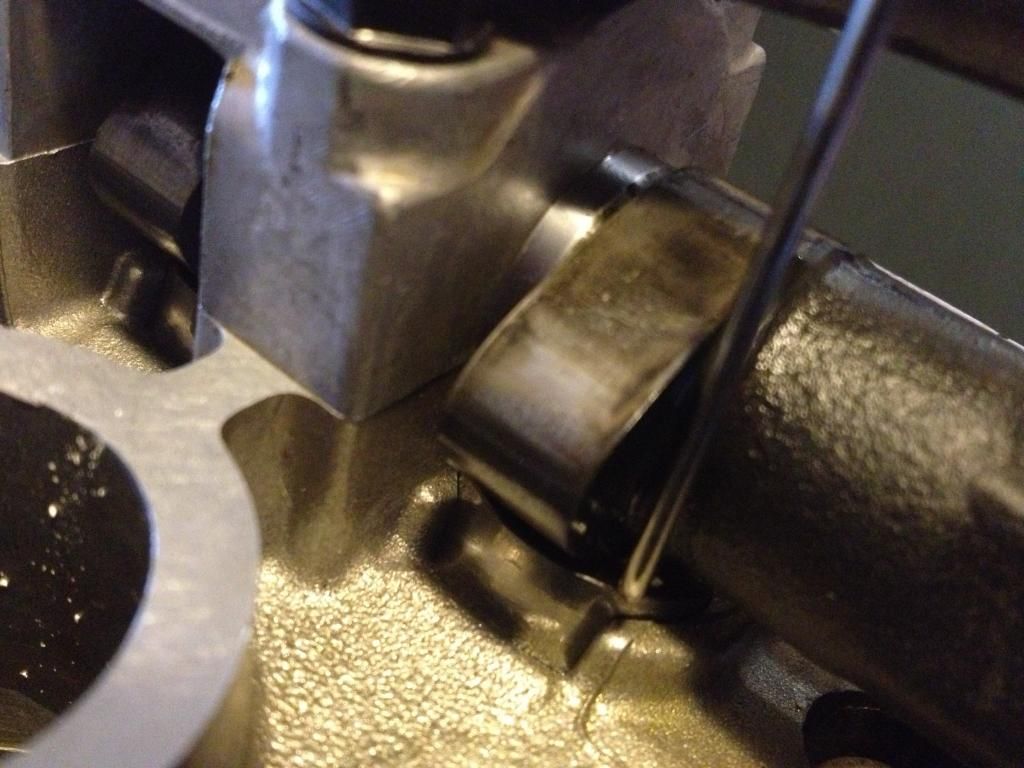
Success at last. The pushbike spoke worked perfectly with rim end of the spoke threaded into the gauge and the hub end with it's golf club type end allowed me to sneak it around the cam and onto the bucket.
I needed to file the top and sides of the hub end though to stop any interference with the cam.
Result..
Inlet .. 104.5* (105* spec)
Exhaust 106* (109* spec)
The 3* works out to almost 0.3 mm of my piston valve clearance at TDC on the exhaust valve once dialed in at 109* so 1 more check on the piston valve clearance to be 100% comfy.
I know I have a healthy 2mm+ .
Final play doe reading was 2.4mm minimum piston/valve clearance on the inlet ( & 2.4mm radial) and 3.6mm minimum on the exhaust.(& 3.4mm radial)
The valve edges stop close to the same height as the piston crown so the valve relief was literally just full of doe.
I feel if the valve was further down into the relief I still would have ample radial clearance so a thinner gasket closer to my 1mm minimum squish would not be an issue.
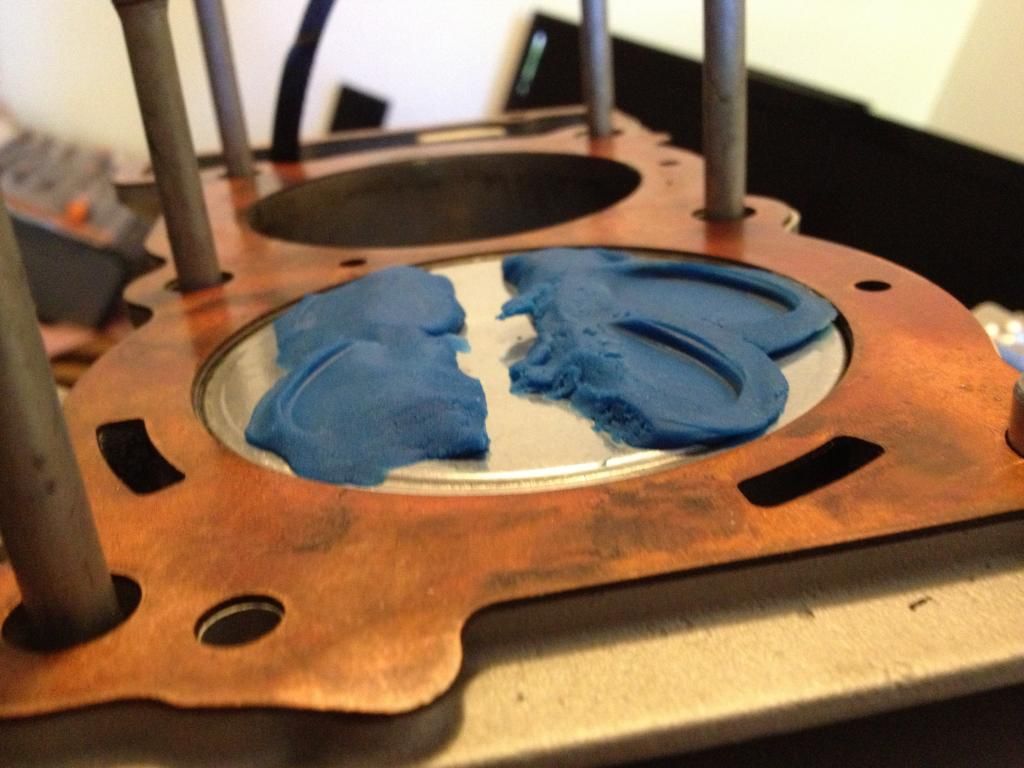
Squish was 1.35mm so I know I if I go for a thinner head gasket closer to my 1mm limit, I'll still have ample P/V clearance.
Tomorrow i shall finally get to bolt the head down for the last time and look at my options on paint for the motor.
Last edited by cobbadiggabuddyblooo on Tue Feb 17, 2015 10:55 am, edited 2 times in total.
laughter is the best medicine
-
cobbadiggabuddyblooo
- Site Sponsor
- Posts: 6809
- Joined: Thu Aug 28, 2008 9:19 am
- Location: Brisbane,Australia
Re: What did you do today? Cobba's rebuild

So nice to have the wind in my face from goin for a ride instead of a dutch oven ...
Quick 5 minute ride as I begin to bed the new brakes in and first impressions are very positive and very good overall feel.
Lever feels firm but with a progressive feel so I'll be happy as Larry if this sensitivity continues the harder I brake.
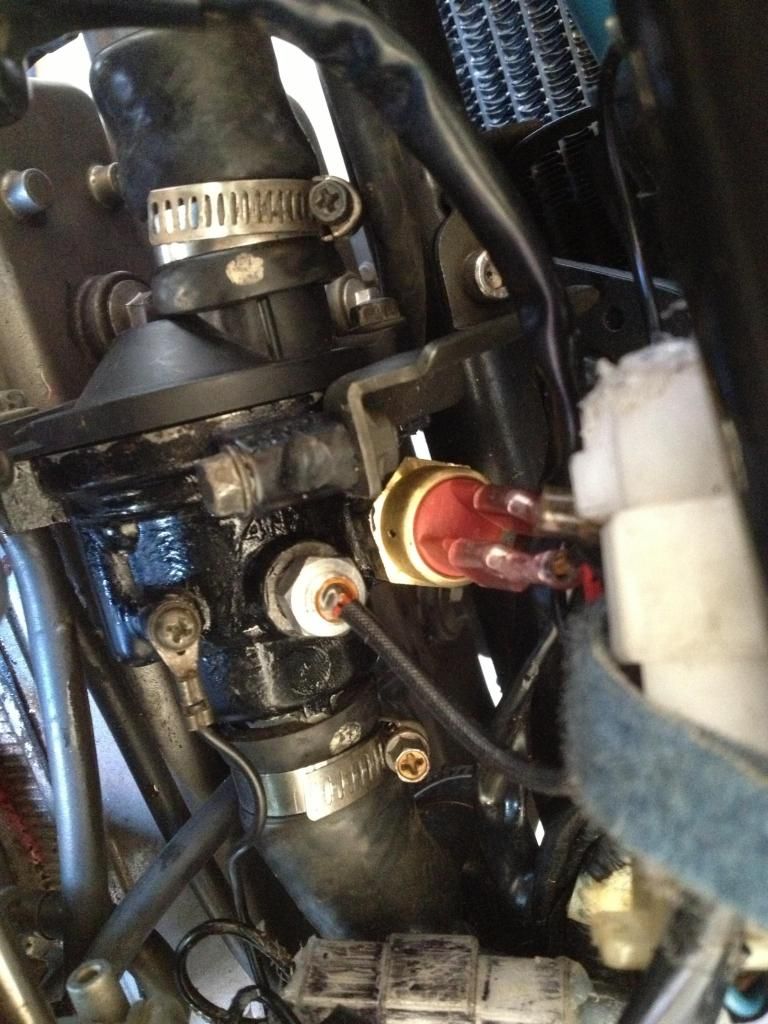
I fitted the Honda accord 10 degree lower value thermo switch and all works well.
Kicks in at 95 degrees and cuts out at 85 degrees.
The 99model R6 radiator arrived yesterday too so managing temperature with the new motor should not be an issue.
I'll take some oil temps over the next week as reference points on a std motor with the std radiator , then disconnect the fan to see what it gets too up around the 107 degrees if using the std thermo switch.
laughter is the best medicine
-
cobbadiggabuddyblooo
- Site Sponsor
- Posts: 6809
- Joined: Thu Aug 28, 2008 9:19 am
- Location: Brisbane,Australia
Re: What did you do today? Cobba's rebuild
Brakes are improving the more I use them. Takes a little longer to get the heat into them to work efficiently so just something to be aware of in the first few minutes of riding.
Water Temperature when I pulled up after general riding was 85*c.
Oil ttemperature came in at 75*c ..
Next challenge will be to cut all those pieces of SHIT connectors I purchased from Jaycar.
Just a sniff of moisture and I have intermittent spark and I noticed when I pulled up I had no neutral light on the dash.
That was after a 2 minute light misty shower and thank god I was 2 minutes from Udaysens place..
I had previously tried to seal the wire/terminal block side of things with silicone and heat shrink but moisture still finds its way obviously through the actual join between the male and female side of the terminal blocks.
Easily accessed when I change the motor in a few weeks time , just means a few hrs soldering and crimping again.
Now on the hunt for a decent supplier of top quality 2-4&8 pin terminal blocks.
laughter is the best medicine