What did you do today? Cobba's rebuild
Moderators: trixynut, Mincehead, dicky, phuk72, Jak, Kevtrx849
-
M.V.
- Site Sponsor
- Posts: 1509
- Joined: Sat Jul 04, 2009 3:23 am
- Location: Melbourne, Australia
Re: What did you do today? Cobba's rebuild
Looking good mate, good work!
-
cobbadiggabuddyblooo
- Site Sponsor
- Posts: 6809
- Joined: Thu Aug 28, 2008 9:19 am
- Location: Brisbane,Australia
Re: What did you do today? Cobba's rebuild
Cheers M.V.
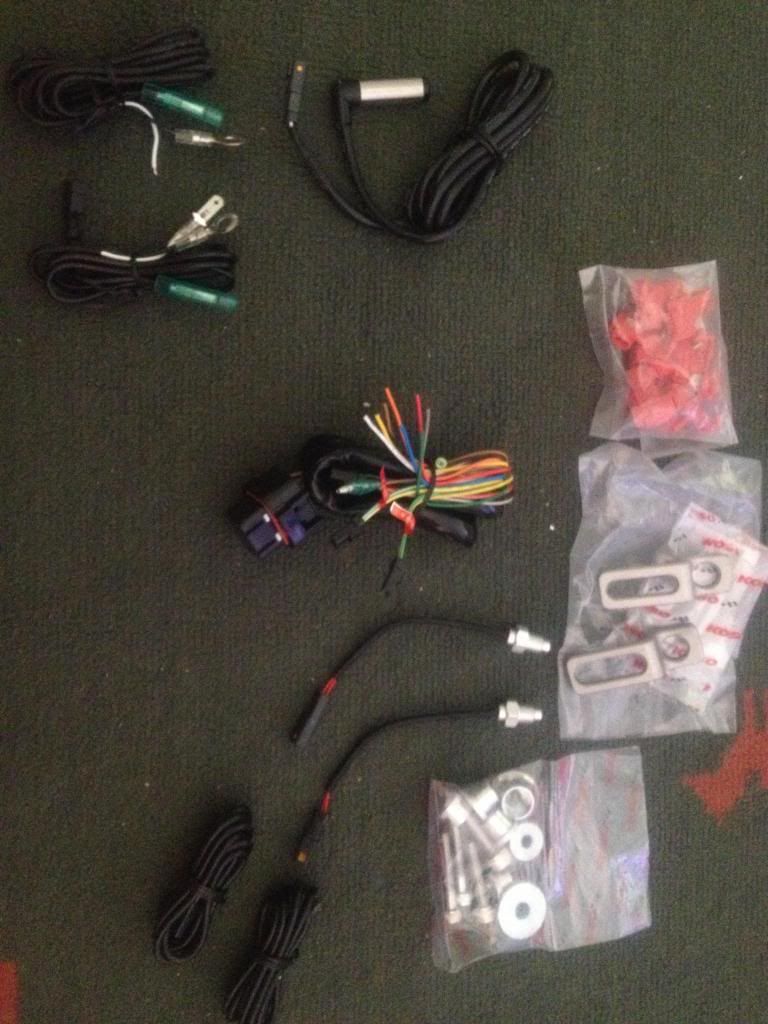
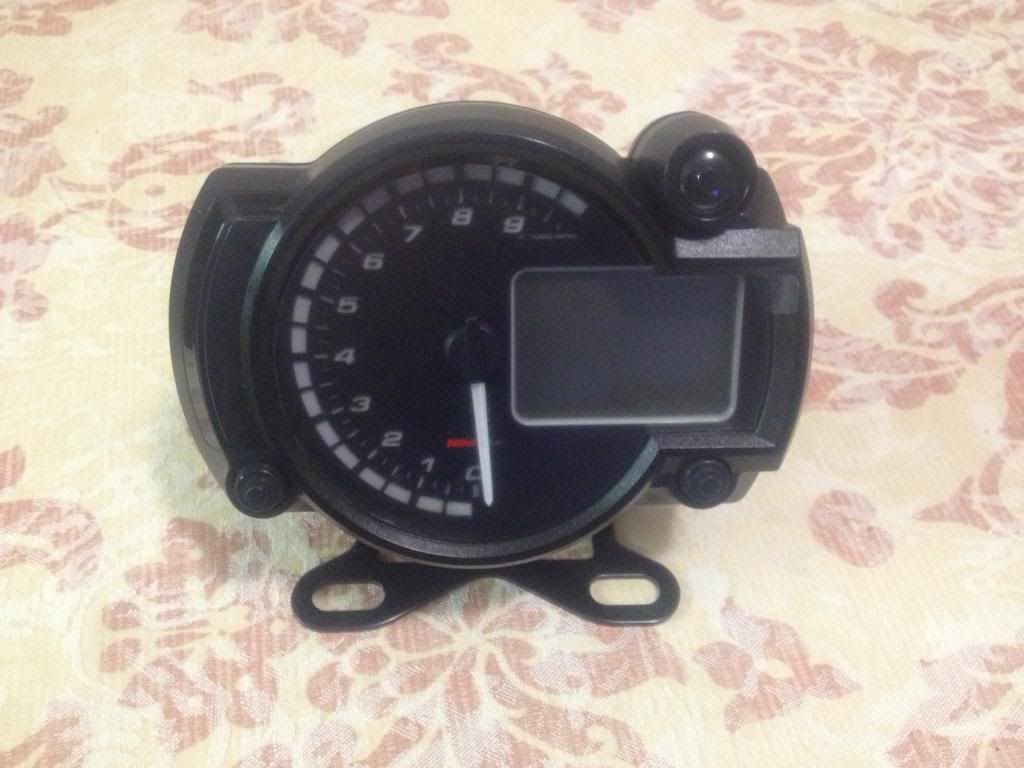
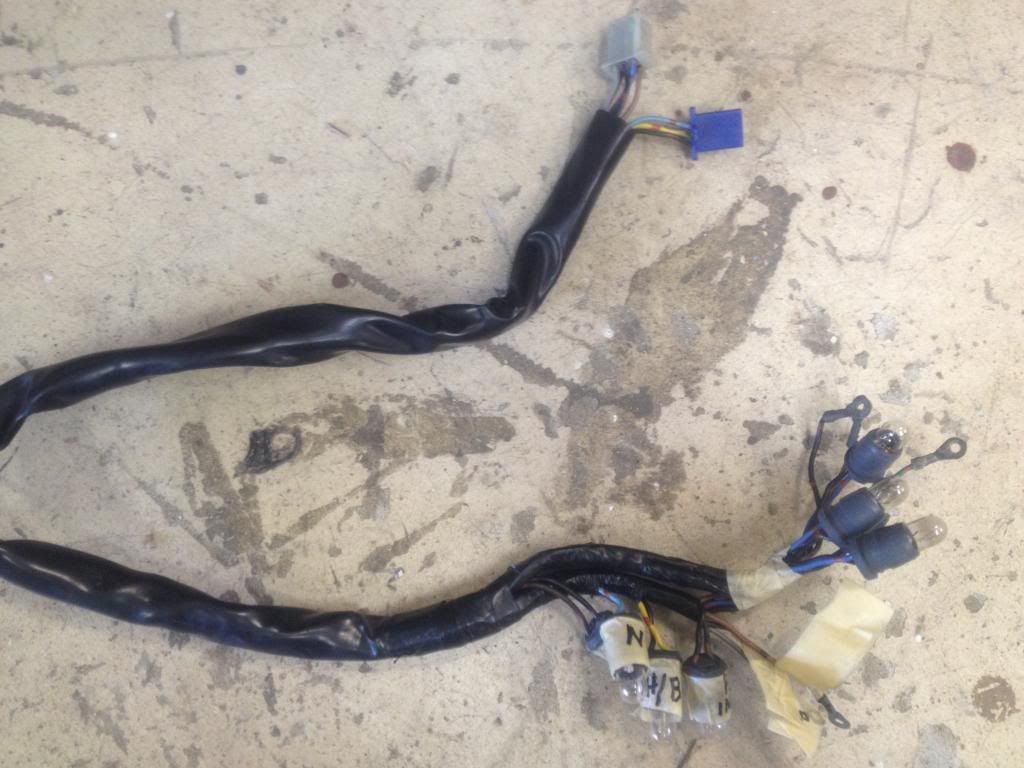
The Koso dash looks easy enough to wire inplace. It comes complete with all the sensors needed and multipin looms. (I only need 1 of the thermal sensors for water temp ) and the taco will be sourced straight from the dash feed as well the Hi beam, indicators and neutral lights and so just a matter of matching the colour codings on the wires.
There's a few wires on the Koso loom that won't be needed for fuel and oil lights ..so the other taco sensing looms they also supply won't be needed either.
The speedo sensor also has two brackets so if you change wheels you can use the other sensor bracket to set up for any difference for trackdays.
After nutting the installation pages that came with it it all seems pretty easy and straight forward and comes with a groovy mounting bracket too.
The Koso dash looks easy enough to wire inplace. It comes complete with all the sensors needed and multipin looms. (I only need 1 of the thermal sensors for water temp
There's a few wires on the Koso loom that won't be needed for fuel and oil lights ..so the other taco sensing looms they also supply won't be needed either.
The speedo sensor also has two brackets so if you change wheels you can use the other sensor bracket to set up for any difference for trackdays.
After nutting the installation pages that came with it it all seems pretty easy and straight forward and comes with a groovy mounting bracket too.
laughter is the best medicine
-
cobbadiggabuddyblooo
- Site Sponsor
- Posts: 6809
- Joined: Thu Aug 28, 2008 9:19 am
- Location: Brisbane,Australia
Re: What did you do today? Cobba's rebuild
So another couple of days later I've made a temp bracket to mount the dash while I start to wire it in place. I'll have to find a piece of right angle steel to help stop any flex and vibration on the dash once mounted properly even though it still uses the roubber mounting points.
I also have to mod the fairing subframe too as the clutch lever touchs the down bracing when will it end..
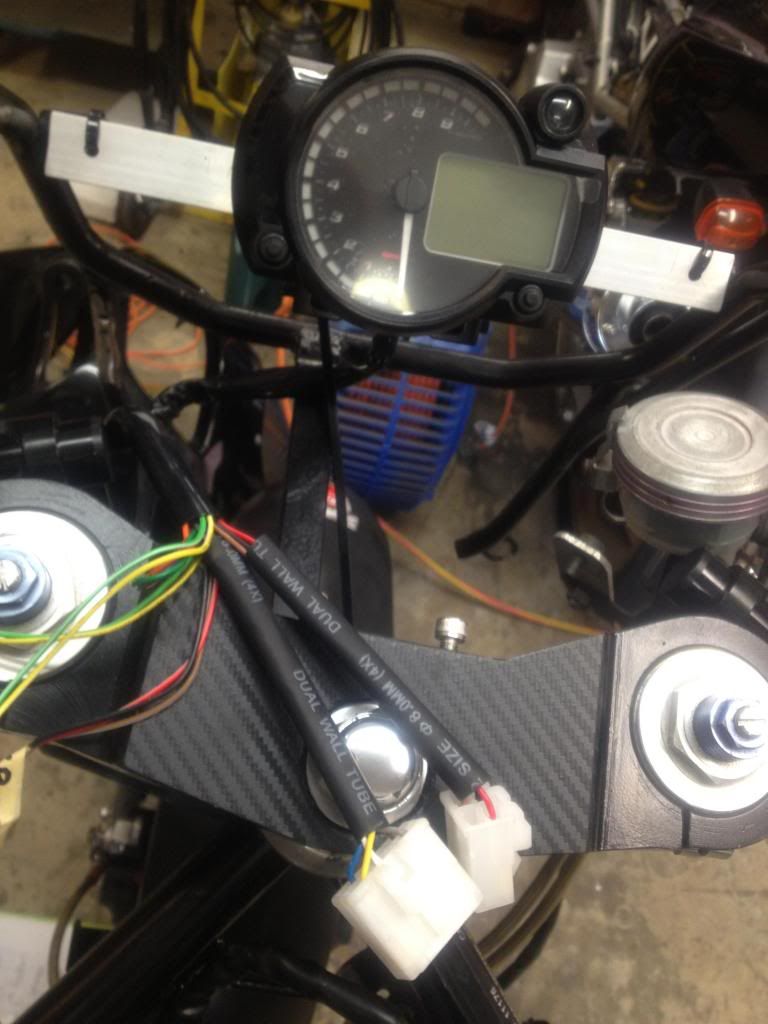
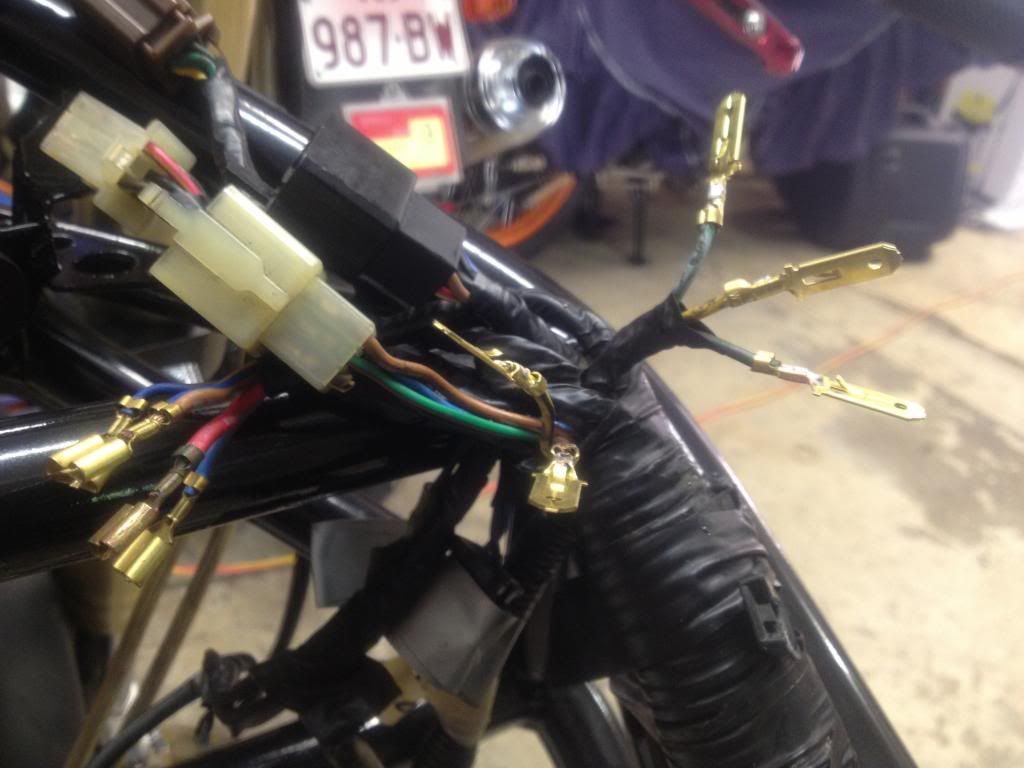
Orinally I thought about taking all I needed from the original TRX dash loom (basicly everything was there apart from power.) but there was enough length on the Koso dash loom to reach where the original dash loom plugs into the main wiring harness..
This also gave me the option to take the power and ignition feeds from the ignition switch connector on the main loom which is right beside where the original dash loom patches in too. So this option allowed for 2 less connectors and shortened the cable run by 400mm or so..
Once I finally finish this I'll put up a wiring patch with colour coding on the cabling for reference if anyone else chooses to go down this route. So tomorrow I hope I complete the wiring then look at how to mount the speed sensor then move on to mounting the dash properly and finishing the bracing mod to the subframe..
So the original Trx dash loom has 2 connectors. 1 x 3 pin and 1x 6 pin. I used the 3 feeds from the 3 pin which was my neutral, hi beam and an indicator feed. I then used 2 feeds from the 6 pin which where both on one end. They where my other indicator feed and taco feed.
I chose not to use the ignition and earth from the other 4 feeds ( oil gauge and dash lights being the other 2 feeds)from the 6 pin connector but to run a seperate earth and the ignition and power coming straight from the ignition switch connectors. The temp sender has its own loom to connect to a small loom supplied by Koso . I'll look at my options to fitting the 2nd temp sender that comes with the dash to the oil somehow too to give me oil temperature .
I also have to mod the fairing subframe too as the clutch lever touchs the down bracing
Orinally I thought about taking all I needed from the original TRX dash loom (basicly everything was there apart from power.) but there was enough length on the Koso dash loom to reach where the original dash loom plugs into the main wiring harness..
This also gave me the option to take the power and ignition feeds from the ignition switch connector on the main loom which is right beside where the original dash loom patches in too. So this option allowed for 2 less connectors and shortened the cable run by 400mm or so..
Once I finally finish this I'll put up a wiring patch with colour coding on the cabling for reference if anyone else chooses to go down this route. So tomorrow I hope I complete the wiring then look at how to mount the speed sensor then move on to mounting the dash properly and finishing the bracing mod to the subframe..
So the original Trx dash loom has 2 connectors. 1 x 3 pin and 1x 6 pin. I used the 3 feeds from the 3 pin which was my neutral, hi beam and an indicator feed. I then used 2 feeds from the 6 pin which where both on one end. They where my other indicator feed and taco feed.
I chose not to use the ignition and earth from the other 4 feeds ( oil gauge and dash lights being the other 2 feeds)from the 6 pin connector but to run a seperate earth and the ignition and power coming straight from the ignition switch connectors. The temp sender has its own loom to connect to a small loom supplied by Koso . I'll look at my options to fitting the 2nd temp sender that comes with the dash to the oil somehow too to give me oil temperature .
laughter is the best medicine
-
cobbadiggabuddyblooo
- Site Sponsor
- Posts: 6809
- Joined: Thu Aug 28, 2008 9:19 am
- Location: Brisbane,Australia
Re: What did you do today? Cobba's rebuild
Another day down with a few hrs spent running taps n dies over the back wheel, cleaning up all the threads and loctite to secure the new disc and rear sprocket inplace.
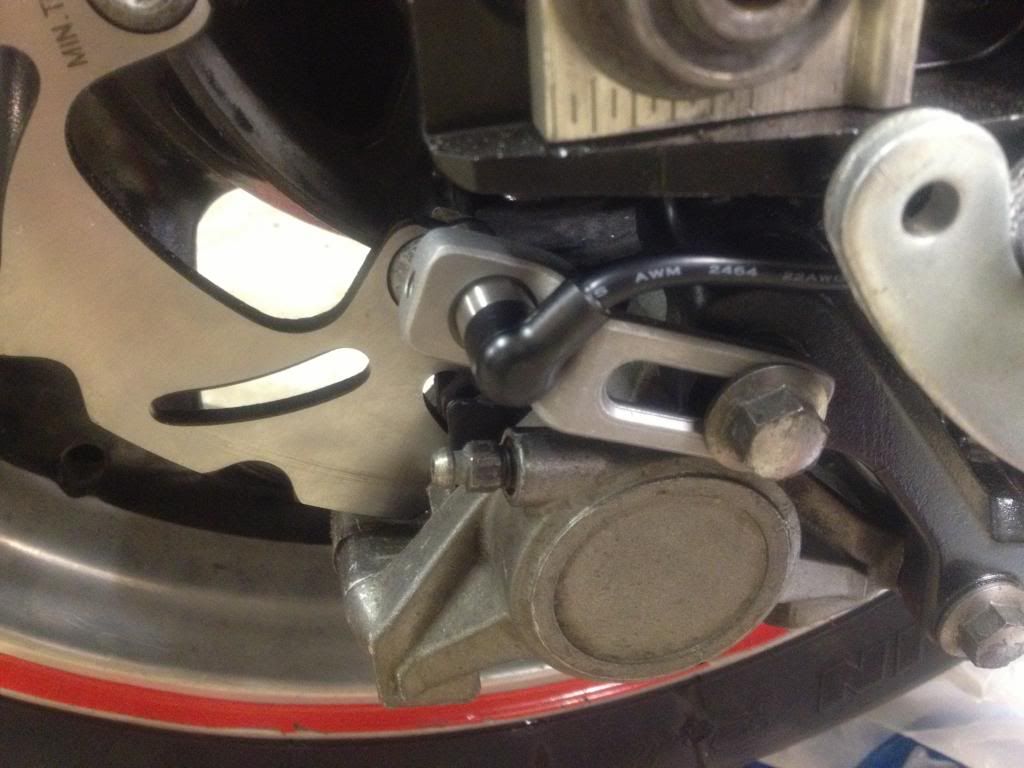
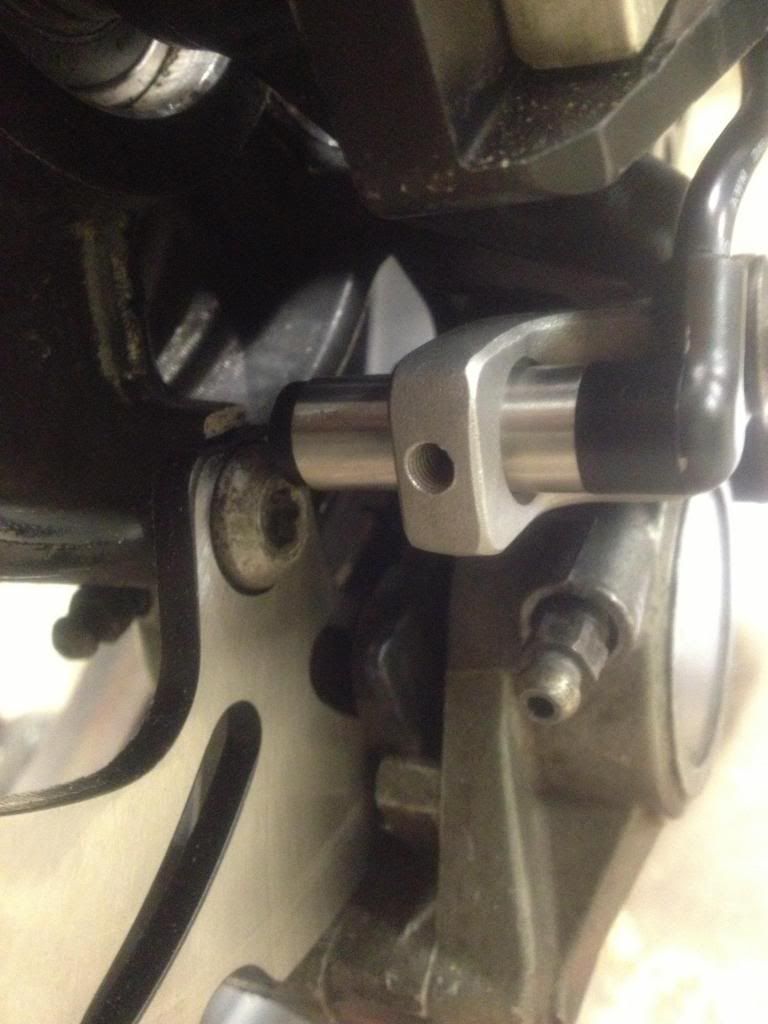
Then time to look at the speed sensor for the Koso dash which reads the head of the bolts on the rear brake disc as a reference.
Now I just calabrate the dash to read 6 boltheads being one rotation and with the circumfrenec of the back wheel placed in the memory, it works out the speed. I mounted it off the rear caliper bolt so if there is any chain adjustment it moves in unicen with it.
I've set it to read the edge of the bolt so there are no false readings from the allen key hole in the centre of the disc bolts.
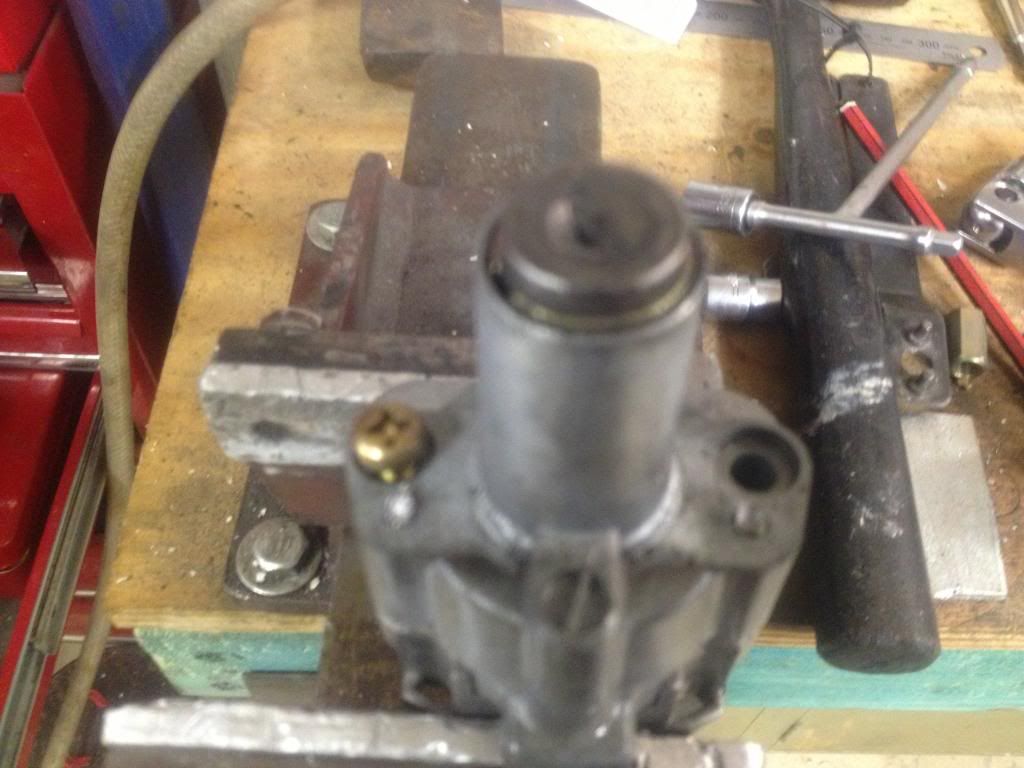
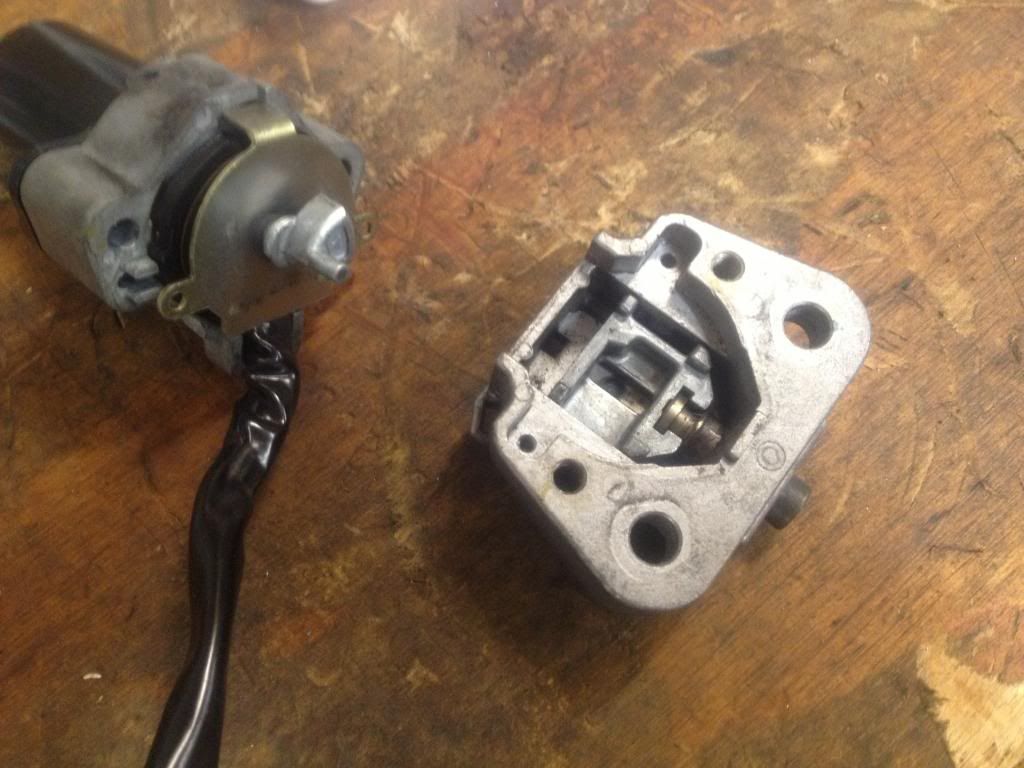
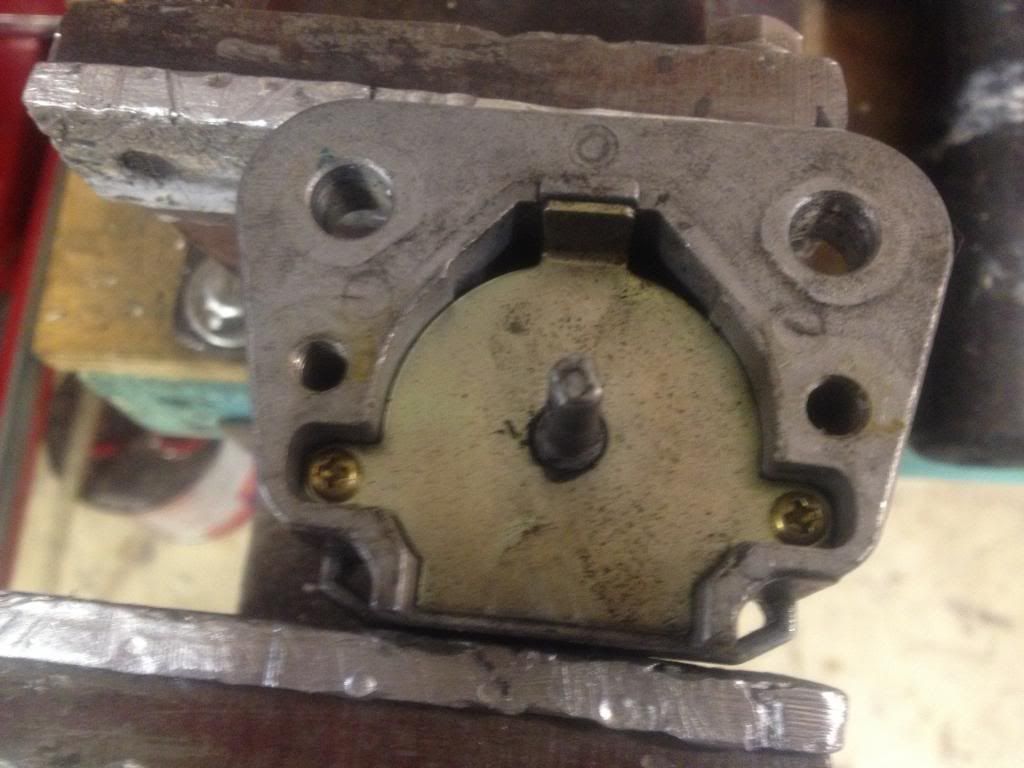
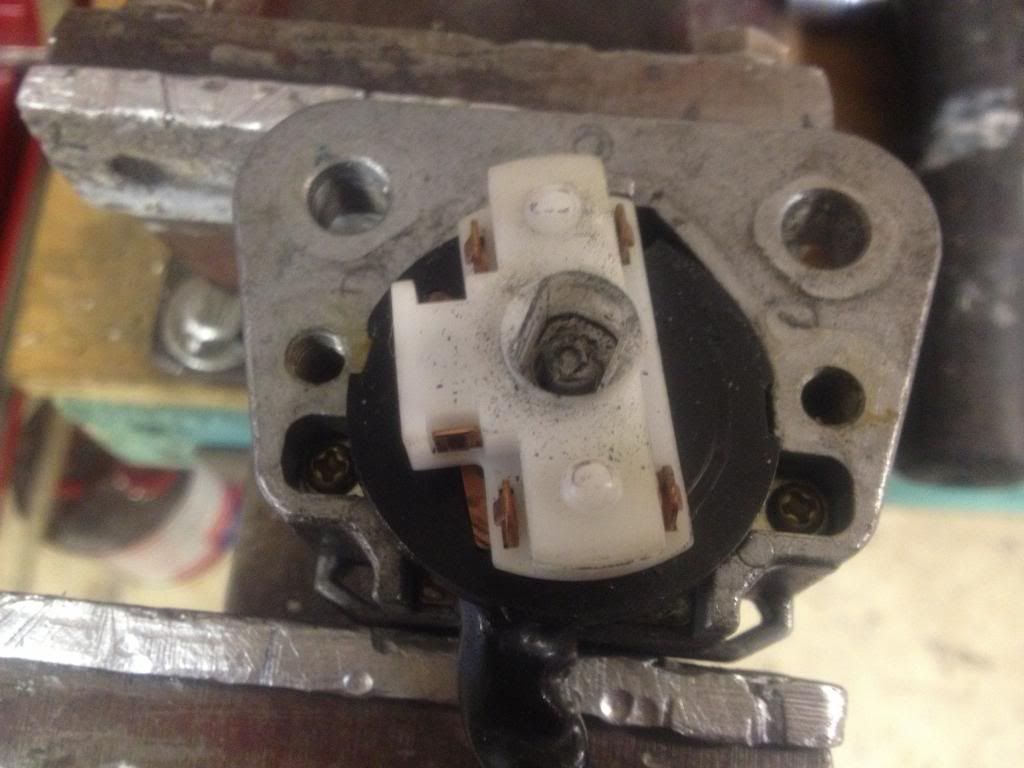
Then time to look at fitting the ignition and no need for the bulky steering lock so time to pull the ignition apart to see if I can just isolate that part and remove it. Firts remove the two plastic bungs and that reveils another 2 rivets. So once drilled out ,what that achieved was to just remove the top black shroud.
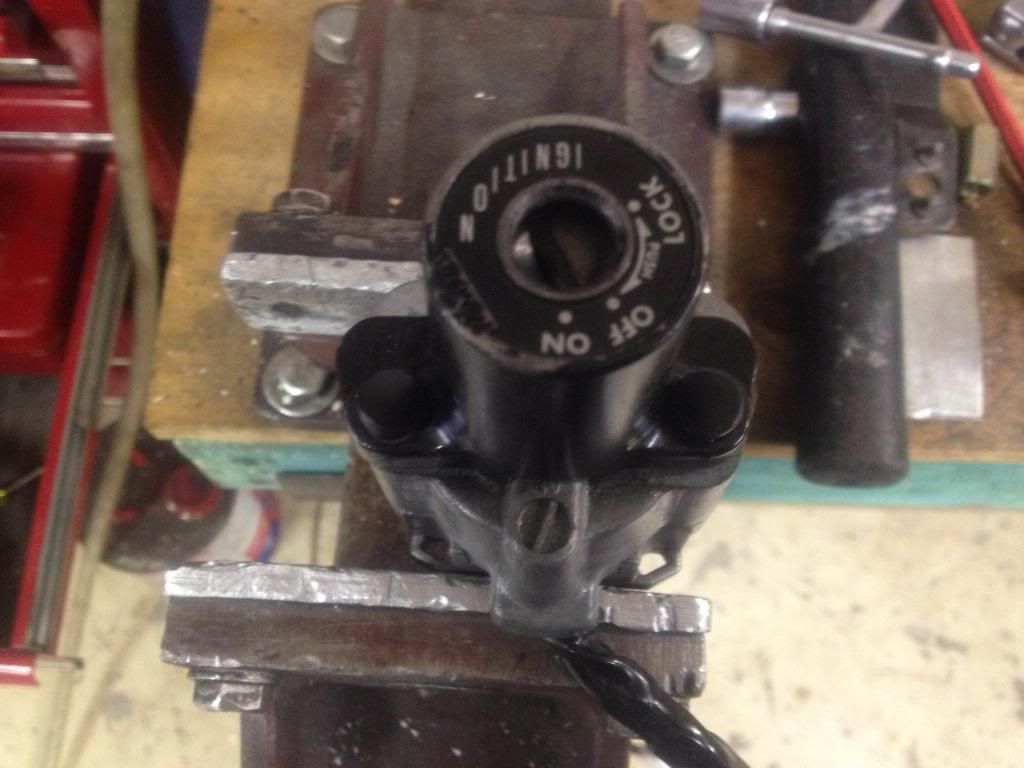
so next step was to undo the two screws and that removed the tumbler section and exposed the ignition wiring mechanism and really no real way to keep things completely seperate from the steering lock.. Oh well I figured a good time to show everyone whats inside so in to the next step.
Then time to look at the speed sensor for the Koso dash which reads the head of the bolts on the rear brake disc as a reference.
Now I just calabrate the dash to read 6 boltheads being one rotation and with the circumfrenec of the back wheel placed in the memory, it works out the speed. I mounted it off the rear caliper bolt so if there is any chain adjustment it moves in unicen with it.
I've set it to read the edge of the bolt so there are no false readings from the allen key hole in the centre of the disc bolts.
Then time to look at fitting the ignition and no need for the bulky steering lock so time to pull the ignition apart to see if I can just isolate that part and remove it. Firts remove the two plastic bungs and that reveils another 2 rivets. So once drilled out ,what that achieved was to just remove the top black shroud.
so next step was to undo the two screws and that removed the tumbler section and exposed the ignition wiring mechanism and really no real way to keep things completely seperate from the steering lock.. Oh well I figured a good time to show everyone whats inside so in to the next step.
laughter is the best medicine
-
cobbadiggabuddyblooo
- Site Sponsor
- Posts: 6809
- Joined: Thu Aug 28, 2008 9:19 am
- Location: Brisbane,Australia
Re: What did you do today? Cobba's rebuild
So here's the inside of your ignition anyhow.
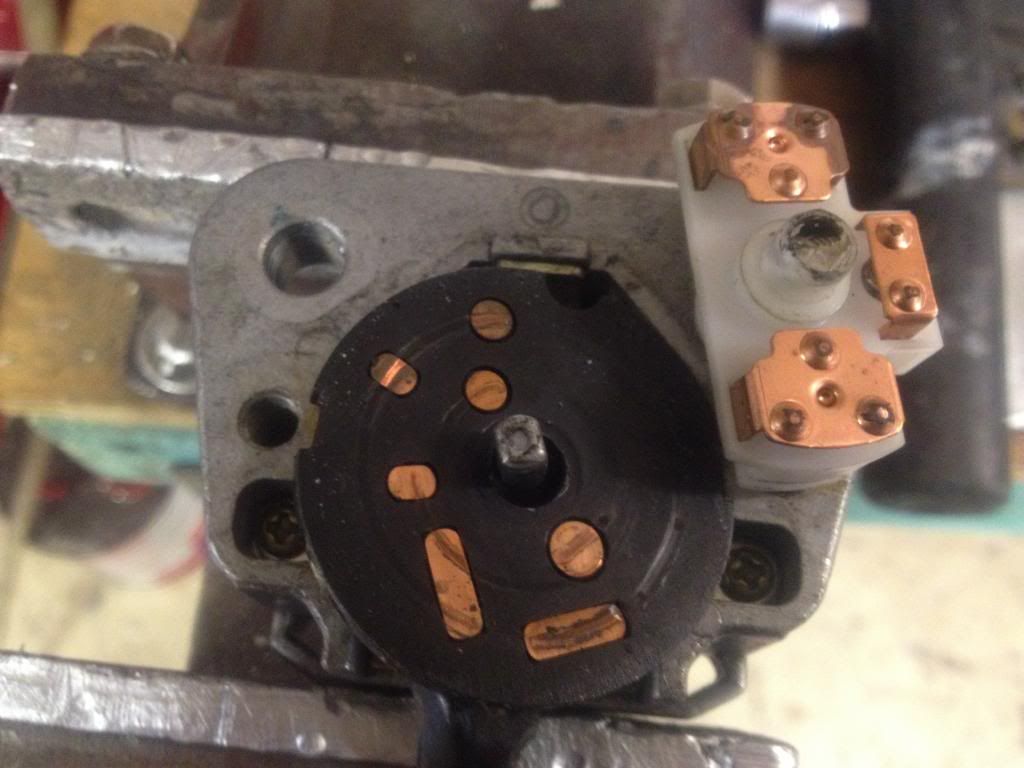
So scrap using the std ignition and with Rod looking over my shoulder he reaches into one of his bags of tricks and hands me a bag full of ignitions.
Too big n bulky in my eyes the std TRX ignition barrell so I found a smaller one and I'm thinking of mounting it just under the front of the tank where the coils use to mount > this will unclutter the area around the dash and I'll now mount the front brake reservior in the centre of the tree. In it's std reservior mounting position it would have fouled the dash anyhow when I turn the bars as I found out . Waste of time soldering that connector on the cable loom from the ignition barrel yesterday
Then he hands me an alarm and says why not go keyless I might look into this option too, but in the meantime.
So next task is to source two new brake reserviors and I think I'll move the rear one also up under the seat so it's not so cluttered in behind the front pegs. Speaking of which when I bolted them on, YUK , these dirty scruffy things as Rod lets out a big belly laugh when I've said OOOH I'll have to get some rearsets now...
Time to go on a search online again
So scrap using the std ignition and with Rod looking over my shoulder he reaches into one of his bags of tricks and hands me a bag full of ignitions.
Too big n bulky in my eyes the std TRX ignition barrell so I found a smaller one and I'm thinking of mounting it just under the front of the tank where the coils use to mount > this will unclutter the area around the dash and I'll now mount the front brake reservior in the centre of the tree. In it's std reservior mounting position it would have fouled the dash anyhow when I turn the bars as I found out . Waste of time soldering that connector on the cable loom from the ignition barrel yesterday
Then he hands me an alarm and says why not go keyless
So next task is to source two new brake reserviors and I think I'll move the rear one also up under the seat so it's not so cluttered in behind the front pegs. Speaking of which when I bolted them on, YUK , these dirty scruffy things
Time to go on a search online again
laughter is the best medicine
-
Rod.s
- Site Sponsor
- Posts: 1406
- Joined: Sun Apr 25, 2010 11:01 am
- Location: Brisbane, Australia
Re: What did you do today? Cobba's rebuild
Is there something missing here? A set-screw maybecobbadiggabuddyblooo wrote:
And the hall sensor is in the centre of the pin, so you may need to move it down a smidge (official OZ slang for the length of a bee's dick)
If it's not made in China, it's a fake!
-
cobbadiggabuddyblooo
- Site Sponsor
- Posts: 6809
- Joined: Thu Aug 28, 2008 9:19 am
- Location: Brisbane,Australia
Re: What did you do today? Cobba's rebuild
Now come on. any cwoosificions today screws fall out so I was thinkin of superglue while you weren't lookin
I'm still making up my mind on the caliper colour first so hold your horses mate.
I'm still making up my mind on the caliper colour first
laughter is the best medicine
-
NWS870R
- Site Sponsor
- Posts: 610
- Joined: Thu Apr 08, 2010 2:59 pm
- Location: Redditch UK
Re: What did you do today? Cobba's rebuild
Might also be worth fitting the magnets into the disc bolts so that the sensor has something to read? 
Life is not about finding yourself, it's about creating yourself.
-
cobbadiggabuddyblooo
- Site Sponsor
- Posts: 6809
- Joined: Thu Aug 28, 2008 9:19 am
- Location: Brisbane,Australia
Re: What did you do today? Cobba's rebuild
And here I was thinkin they where fridge magnets  now hhat am I to use to hold up my calander
laughter is the best medicine
-
alextrx850
- Site Sponsor
- Posts: 2149
- Joined: Sat Apr 02, 2011 10:36 pm
- Location: brisbane AUSTRALIA
Re: What did you do today? Cobba's rebuild
So how do the pick-up magnets get fixed to the disc rotor or the wheel as other types do..tape as a wheel weight.?
-
cobbadiggabuddyblooo
- Site Sponsor
- Posts: 6809
- Joined: Thu Aug 28, 2008 9:19 am
- Location: Brisbane,Australia
Re: What did you do today? Cobba's rebuild
All jokes aside, the dash kit does not actually supply the sensor magnets and the instruction manual only recommends that it needs a 2mm gap between the sensor pickup and the side of the disc bolt head.
The sensor magnets are an optional extra to strengthen the signal and with the tollerence going down on speed reading within3% from the police, I'm not taking any chances.....
Another thing to add to the shopping list.. I'll need 6, 3 for each clutchub .. Thanks for the heads up on that too folks,
Now here's a thought if you can magnetise a screwdriver , can you magnetise the disc bolt to do the same job
The sensor magnets are an optional extra to strengthen the signal and with the tollerence going down on speed reading within3% from the police, I'm not taking any chances.....
Another thing to add to the shopping list.. I'll need 6, 3 for each clutchub .. Thanks for the heads up on that too folks,
Now here's a thought
laughter is the best medicine
-
dicky
- Site Sponsor / Administrator
- Posts: 1120
- Joined: Thu Jan 06, 2005 11:26 am
- Location: Ruffy, Victoria.
Re: What did you do today? Cobba's rebuild
Is the sensor Hall Effect or inductive?
Hall Effect typically needs a magnet or at least something that has been magnetised (such as the bolt).
Inductive only needs something metallic. These sensors are very common in industrial control applications.
I have been using the inductive sensors for years as pickups for rally car trip meters, mounted behind the front disk and picking up the bolt heads as they whizz past.
You should be able to test it by powering up the dash unit and waving the sensor around a lump of metal.
dicky.
-
cobbadiggabuddyblooo
- Site Sponsor
- Posts: 6809
- Joined: Thu Aug 28, 2008 9:19 am
- Location: Brisbane,Australia
Re: What did you do today? Cobba's rebuild
Thanks for the input Dicky. I have to get my ignition sorted first to get it all happening. Gives me time tho to throw the question on inductive or Hall effect to Koso themselves ..
laughter is the best medicine
-
dicky
- Site Sponsor / Administrator
- Posts: 1120
- Joined: Thu Jan 06, 2005 11:26 am
- Location: Ruffy, Victoria.
Re: What did you do today? Cobba's rebuild
You've got ignition problems?
I know a guy who sells a great replacement ignition unit for the TRX.
I'll see if I can find his details
dicky.
I know a guy who sells a great replacement ignition unit for the TRX.
I'll see if I can find his details
dicky.
-
cobbadiggabuddyblooo
- Site Sponsor
- Posts: 6809
- Joined: Thu Aug 28, 2008 9:19 am
- Location: Brisbane,Australia