I don't actually have the barrels/ pistons with me .
I'm having copper head gaskets made so not at my disposal at present.
They should be able to work out what you need tho with chamber volume , stroke , and gasket thickness you choose to run as these will all dictate the compression ratio you want to make them and depth of valve pockets for clearance.
What did you do today? Cobba's rebuild
Moderators: trixynut, Mincehead, dicky, phuk72, Jak, Kevtrx849
-
cobbadiggabuddyblooo
- Site Sponsor
- Posts: 6809
- Joined: Thu Aug 28, 2008 9:19 am
- Location: Brisbane,Australia
Re: What did you do today? Cobba's rebuild
laughter is the best medicine
-
cobbadiggabuddyblooo
- Site Sponsor
- Posts: 6809
- Joined: Thu Aug 28, 2008 9:19 am
- Location: Brisbane,Australia
Re: What did you do today? Cobba's rebuild
Point to note.
The pin from the starter idler gear that locates into the crankcase also locates on the other end into the Alternator engine cover.
I knew it was somewhere (Thanks Paul )as it was not in the box containing all the parts from this engine case. It was in the engine Alt case itself beside the stator.

The oil pump side complete (although I need to pull it apart to place in the cam chain), the starter gear is now in place but I need to work out a good way to hold the rotor in place so I may tighten it back onto the crank without spinning the crank .
Any suggestions as I don't have the sheave holder tool listed in the manual and I don't want to place a piece of timber in through the small end bearings on con rods.
Once this is tightened next will be to fit the the slipper clutch.
Last edited by cobbadiggabuddyblooo on Mon Nov 10, 2014 12:39 pm, edited 1 time in total.
laughter is the best medicine
-
brockzila

- TRX-Enthusiast
- Posts: 348
- Joined: Mon Feb 18, 2008 2:30 pm
Re: What did you do today? Cobba's rebuild
thanks mate but dont worry. I measured the crown of the piston end of last week and they are only 6mm thick so its not going to work.cobbadiggabuddyblooo wrote:I don't actually have the barrels/ pistons with me .
I'm having copper head gaskets made so not at my disposal at present.
They should be able to work out what you need tho with chamber volume , stroke , and gasket thickness you choose to run as these will all dictate the compression ratio you want to make them and depth of valve pockets for clearance.
As to why, Well why not.
So when yamaha stops making/selling them there will be another option known that is easy and cheap to accesses for people in the future.
Is it Brock friendly???
-
Con Rod

- Site Sponsor
- Posts: 1126
- Joined: Wed Nov 16, 2011 11:48 pm
- Location: Sydney, Australia
Re: What did you do today? Cobba's rebuild
good that you found the pin, those  moments are part and parcel of rebuilding bikes. We have all had our fair share
can you place something in the gear to stop it turning whilst you tighten it?
can you place something in the gear to stop it turning whilst you tighten it?
Paul
-
cobbadiggabuddyblooo
- Site Sponsor
- Posts: 6809
- Joined: Thu Aug 28, 2008 9:19 am
- Location: Brisbane,Australia
Re: What did you do today? Cobba's rebuild
I've heard of people jamming a copper coin into the teeth but that sounds a bit painful on the teeth.
Rod had a section of box steel with a seat belt fitted that could be wrapped around the rotor to lock upon itself but the belt was just too short.
A big shifter is placed onto the box steel to hold it once wound tight onto the rotor.
Maybe go to the wreckers and get an old seat belt and see what we can manufacture up.
laughter is the best medicine
-
Rich
- Site Sponsor
- Posts: 217
- Joined: Mon Dec 23, 2013 8:20 pm
- Location: Derbyshire UK
Re: What did you do today? Cobba's rebuild
Are they tapped holes in the rotor back plate, do you have access to welding gear? I'm thinking get some angle iron, cut two bits and drill to fit holes, weld top a piece of rod / tube / flat to make a handle bolt to rotor and should do the job.
-
misterdimwiddy
- TRX-Enthusiast
- Posts: 474
- Joined: Thu Apr 08, 2010 6:14 am
- Location: Ware, Hertfordshire
Re: What did you do today? Cobba's rebuild
I used a 2" wide fabric strap wrench around the rotor. Just make sure that the raised trigger for the ign pickup doesn't get mashed.cobbadiggabuddyblooo wrote:
Point to note.
The pin from the starter idler gear that locates into the crankcase also locates on the other end into the Alternator engine cover.
I knew it was somewhere (Thanks Paul )as it was not in the box containing all the parts from this engine case. It was in the engine Alt case itself beside the stator.
The oil pump side complete (although I need to pull it apart to place in the cam chain), the starter gear is now in place but I need to work out a good way to hold the rotor in place so I may tighten it back onto the crank without spinning the crank .
Any suggestions as I don't have the sheave holder tool listed in the manual and I don't want to place a piece of timber in through the small end bearings on con rods.
Once this is tightened next will be to fit the the slipper clutch.
-
PrfctChaos

- TRX-Enthusiast
- Posts: 73
- Joined: Wed Nov 06, 2013 2:54 am
- Location: Perth, Australia
Re: What did you do today? Cobba's rebuild
By far the easiest way would be to place something between the crank shaft and housing (where the big-end is). You mentioned that you do not want to use a piece of wood, I agree a piece of wood is way to dirty for the inside of a engine. In the past I have used the plastic handle of a screwdriver.
However, have also used a piece of strap in the past. Also, can you hold it using the flywheel bolt, or is it spinning the other way?
However, have also used a piece of strap in the past. Also, can you hold it using the flywheel bolt, or is it spinning the other way?
1996 TRX, Front end from a 2006 GSXR 750, Seat off a 2012 Triumph street triple. TDMR carbs, Laser cans, Perreli Rosso Supercorsas.
-
QuickDraw

- Site Sponsor
- Posts: 165
- Joined: Thu Dec 16, 2010 9:06 am
- Location: Sunshine Coast, QLD
- Contact:
Re: What did you do today? Cobba's rebuild
That's how I did it Brian. Sing out of you want me to have a rat through the toolbox. I can bring the bits down through the week.Are they tapped holes in the rotor back plate, do you have access to welding gear? I'm thinking get some angle iron, cut two bits and drill to fit holes, weld top a piece of rod / tube / flat to make a handle bolt to rotor and should do the job.
-
cobbadiggabuddyblooo
- Site Sponsor
- Posts: 6809
- Joined: Thu Aug 28, 2008 9:19 am
- Location: Brisbane,Australia
Re: What did you do today? Cobba's rebuild
That will be great Brett if you can find it and bring it down when you pick up the tyres. Thank you.
In digging through my spares at present for an old steel clutch plate so I can make up a clutch tool too.
Today was clutch day and prepping the slipper clutch.
I'll post photos shortly of the days fun.

Once all was cleaned in the kero bath it was time to take the original parts needed.
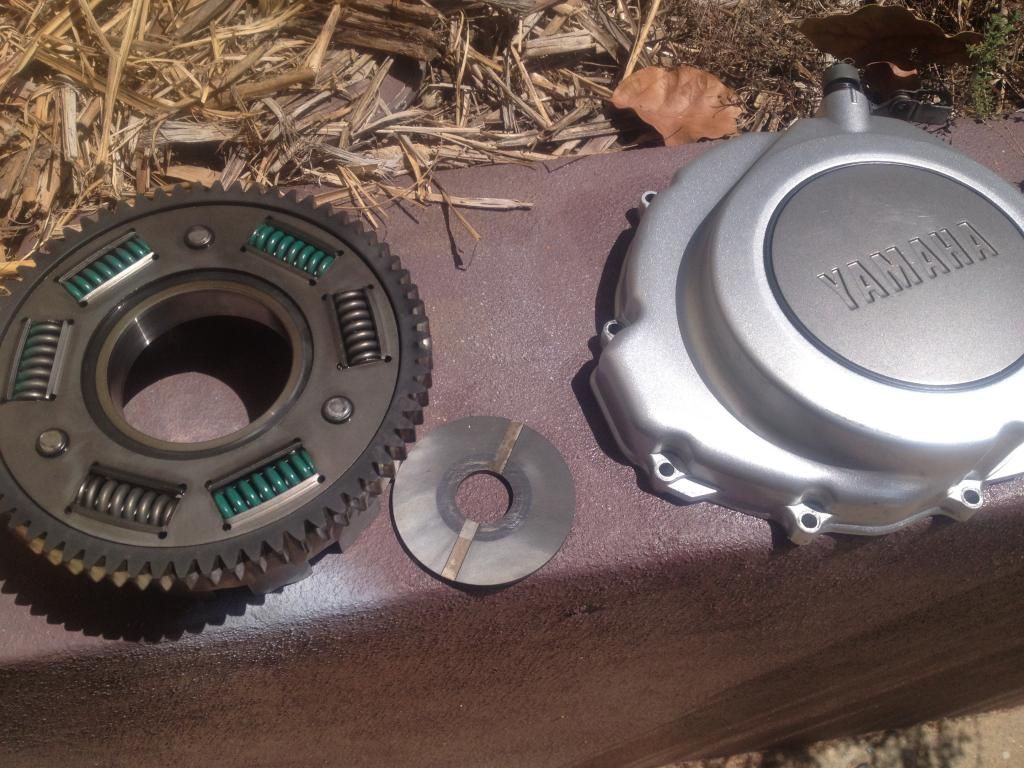
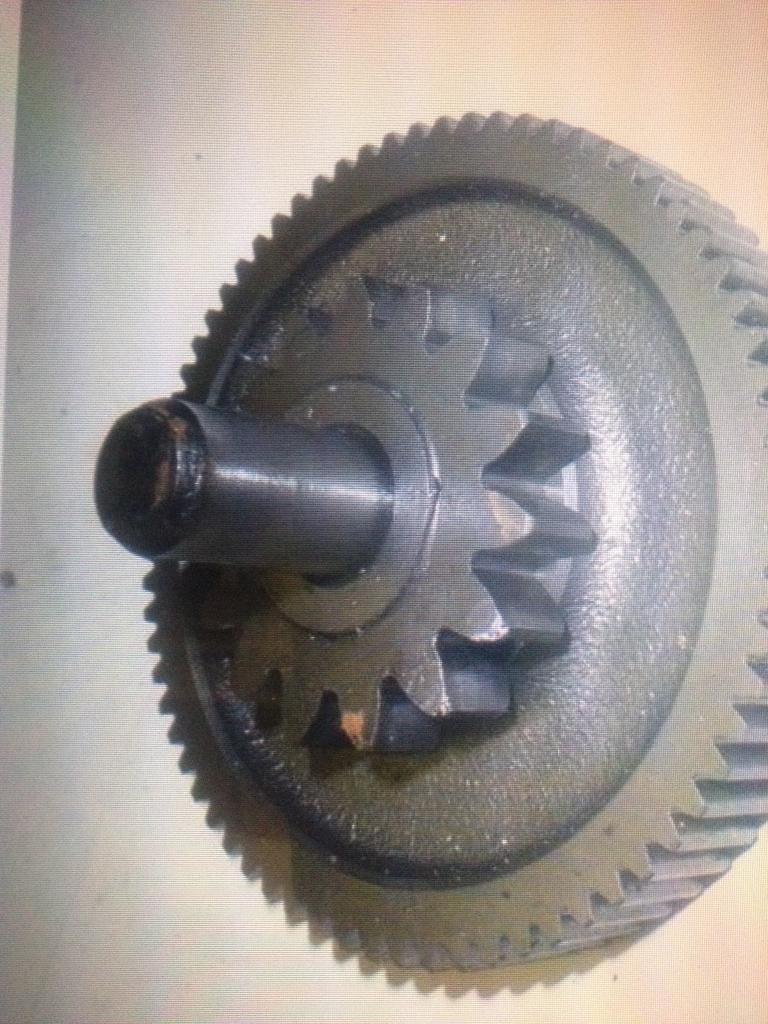
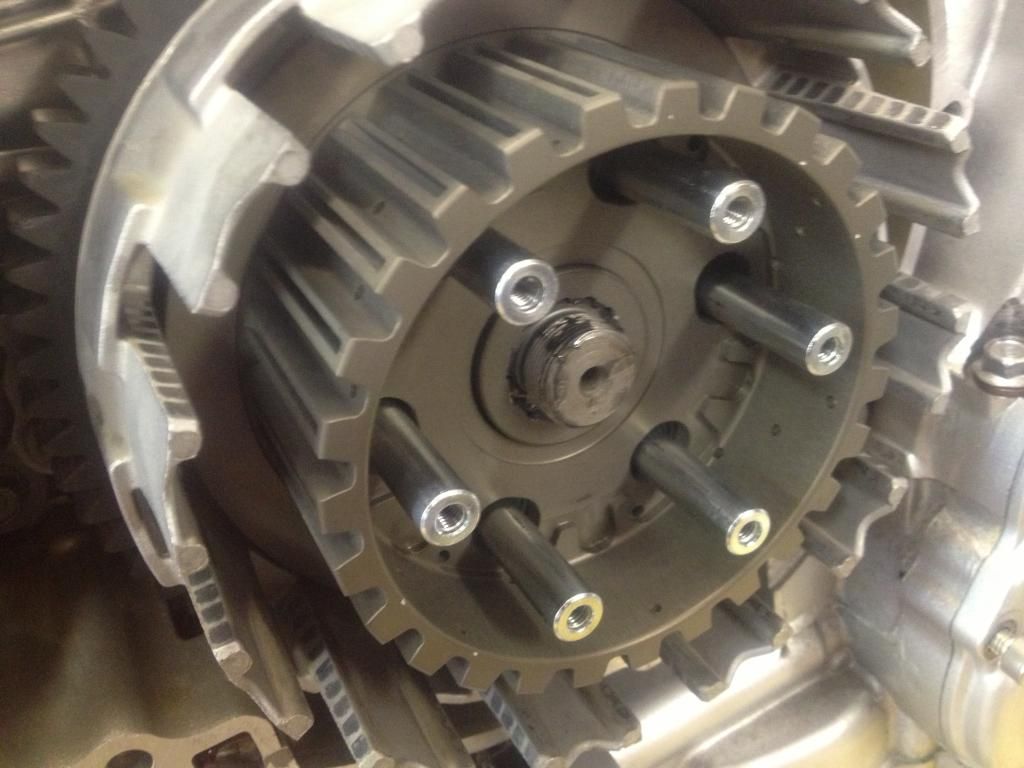
The clutch boss from the original clutch is not needed as this inner section is replaced by the slipper clutch boss.
You can see the difference with the original boss on the next photo and the Sigma slipper boss.
The original boss is just one piece where the slipper is 2 piece with a separate base so as the centre rotates and lift separating the plates enough to slip. You can see how the spring mounting poles have elongated holes in the plate for this action compared to the solid 1 piece on the original.

In digging through my spares at present for an old steel clutch plate so I can make up a clutch tool too.
Today was clutch day and prepping the slipper clutch.
I'll post photos shortly of the days fun.
Once all was cleaned in the kero bath it was time to take the original parts needed.
The clutch boss from the original clutch is not needed as this inner section is replaced by the slipper clutch boss.
You can see the difference with the original boss on the next photo and the Sigma slipper boss.
The original boss is just one piece where the slipper is 2 piece with a separate base so as the centre rotates and lift separating the plates enough to slip. You can see how the spring mounting poles have elongated holes in the plate for this action compared to the solid 1 piece on the original.
laughter is the best medicine
-
cobbadiggabuddyblooo
- Site Sponsor
- Posts: 6809
- Joined: Thu Aug 28, 2008 9:19 am
- Location: Brisbane,Australia
Re: What did you do today? Cobba's rebuild
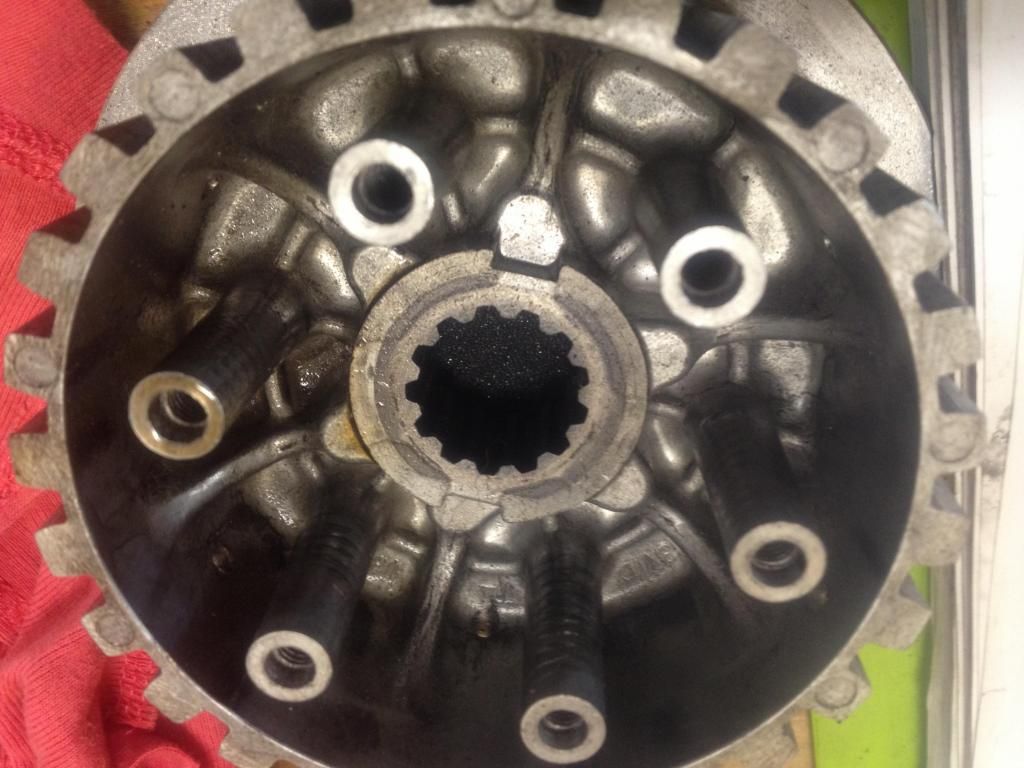
Here you can see the base and the action with the ball bearings as the centre rotates and separates the plates.
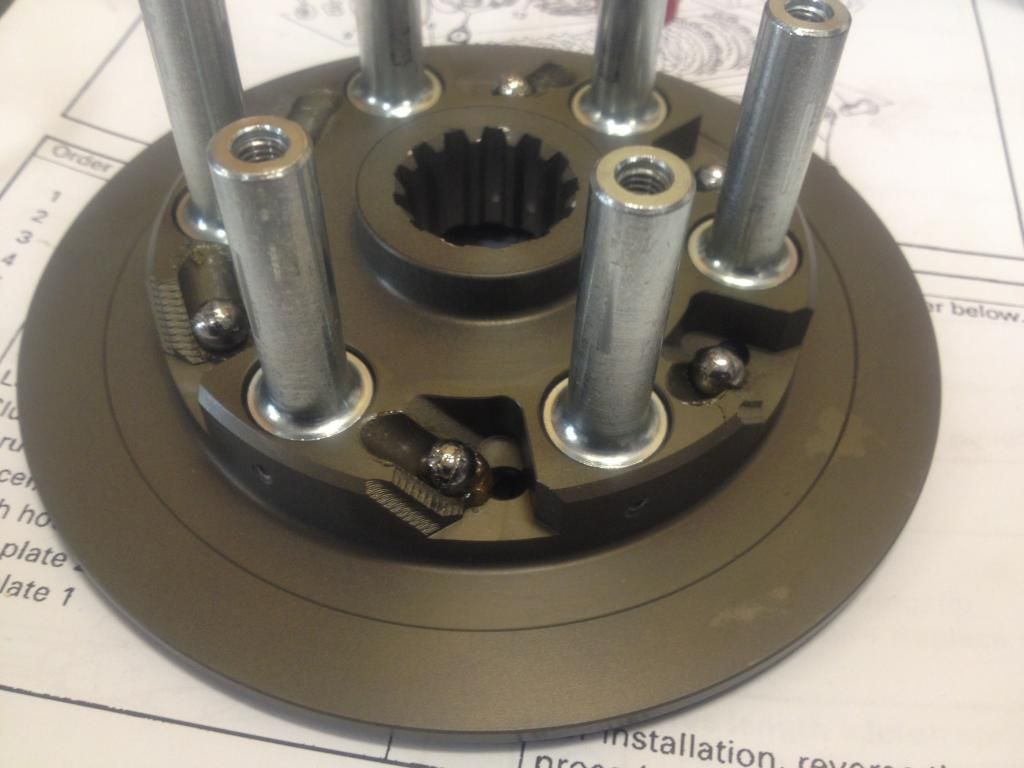
And the inner section of the boss

Now all I need to do it make up a clutch holder tool from a old clutch plate.
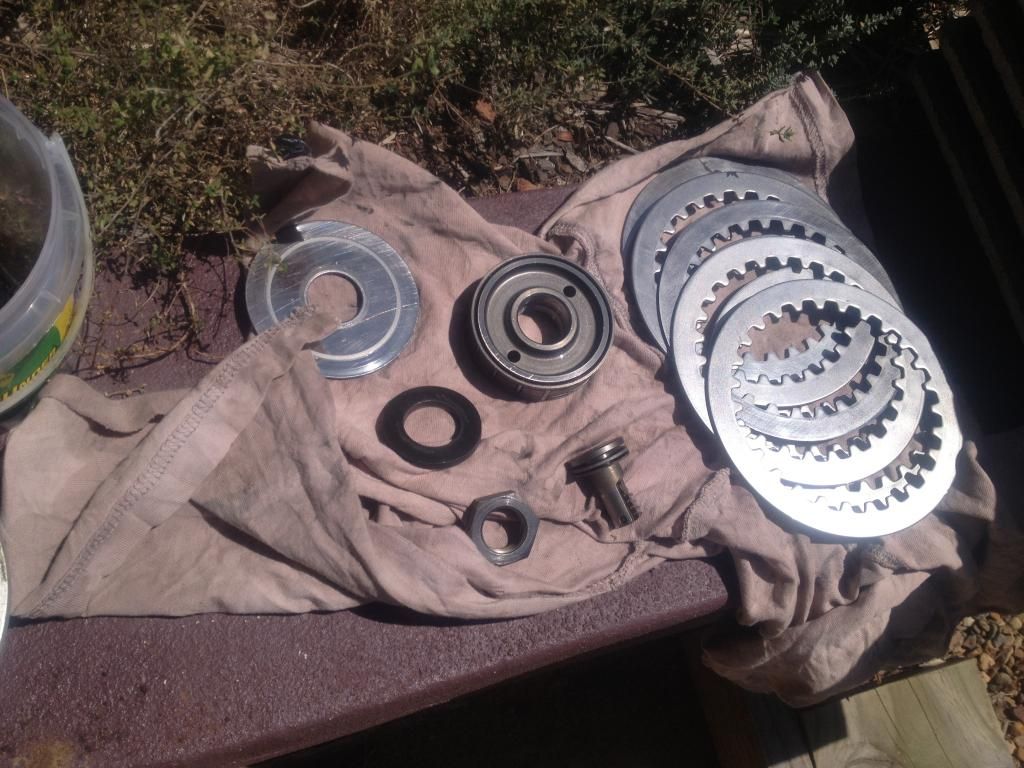
I have new kevlar friction plates for a R6 to fit in place and a selection of new std weight springs and 15% heavier springs to get the desired action from the clutch. There where also another set of pre load spacers in the kit as both spring rate and preload all have a part to play in the slipping action of the clutch.
This sums it up nicely from the Sigma disc supplied.
Spring rate/ preload.
Once the ‘rising centre’ has reached the underside of the pressure plate and started to lift it the effort that has to be expended to keep it there crates the feeling of engine braking that still gets through to the rear tyre. So, stiffer springs or more preload will hold the clutch together more (the clamping force) and those stiffer springs will mean that more engine braking gets through to the tyre. It also creates heat in the clutch pack and more wear on the plates. Conversely less spring or preload will reduce the clamping force and less engine braking will be felt.
In several clutches we provide additional preload spacers that apply more preload. These can be used as a set (which makes a big increase in preload,) or if you want more sensitive adjustments you can use 2, 3, 4 or 5 amongst the standard preload spacers. If you do this try to ‘balance’ the preload by using the hi preload adjusters opposite each other..
Tuned engines
If you have a tuned engine you may need stiffer springs, or more preload, to hold the clutch together under power. It is very important for the condition and longevity of the clutch that it is not allowed to slip under power.
Race kit springs from the manufacturer can be used, but sometimes these apply too much force for the right slip. As an example many riders of Supersport tuned R6 Yamaha’s using our 37 degree clutch like 2 or 3 race kit springs spaced equally with road springs.
And the inner section of the boss
Now all I need to do it make up a clutch holder tool from a old clutch plate.
I have new kevlar friction plates for a R6 to fit in place and a selection of new std weight springs and 15% heavier springs to get the desired action from the clutch. There where also another set of pre load spacers in the kit as both spring rate and preload all have a part to play in the slipping action of the clutch.
This sums it up nicely from the Sigma disc supplied.
Spring rate/ preload.
Once the ‘rising centre’ has reached the underside of the pressure plate and started to lift it the effort that has to be expended to keep it there crates the feeling of engine braking that still gets through to the rear tyre. So, stiffer springs or more preload will hold the clutch together more (the clamping force) and those stiffer springs will mean that more engine braking gets through to the tyre. It also creates heat in the clutch pack and more wear on the plates. Conversely less spring or preload will reduce the clamping force and less engine braking will be felt.
In several clutches we provide additional preload spacers that apply more preload. These can be used as a set (which makes a big increase in preload,) or if you want more sensitive adjustments you can use 2, 3, 4 or 5 amongst the standard preload spacers. If you do this try to ‘balance’ the preload by using the hi preload adjusters opposite each other..
Tuned engines
If you have a tuned engine you may need stiffer springs, or more preload, to hold the clutch together under power. It is very important for the condition and longevity of the clutch that it is not allowed to slip under power.
Race kit springs from the manufacturer can be used, but sometimes these apply too much force for the right slip. As an example many riders of Supersport tuned R6 Yamaha’s using our 37 degree clutch like 2 or 3 race kit springs spaced equally with road springs.
laughter is the best medicine
-
Con Rod
- Site Sponsor
- Posts: 1126
- Joined: Wed Nov 16, 2011 11:48 pm
- Location: Sydney, Australia
-
M.V.

- Site Sponsor
- Posts: 1509
- Joined: Sat Jul 04, 2009 3:23 am
- Location: Melbourne, Australia
Re: What did you do today? Cobba's rebuild
Took the words right out of my mouth!Con Rod wrote:God that's nice.
Definitely a thing I would consider, even at the extortionary price!
-
pbear62
- TRX-Enthusiast
- Posts: 349
- Joined: Mon Oct 13, 2008 4:38 am
- Location: Perth, Western Australia
Re: What did you do today? Cobba's rebuild
Another option for 'holding' gears to make things easier to undo or tighten is to feed a piece of small diameter (3mm) nylon
rope between the gears - as the rope moves into the contact area between the gears it'll 'jam' things up nicely with no damage
to the teeth.
I've also used this method to tighten/loosen flywheel nuts etc on dirtbikes by getting the engine nearly to TDC then feeding one
end of the rope in through the sparkplug hole & turning it over slowly until the piston stops against the rope & can't go over TDC.
Easy!!
Once you've had black - you'll never go back!
Bigamy is when you have one wife too many - Monogamy is the same!
Bigamy is when you have one wife too many - Monogamy is the same!
-
Stu99
- Site Sponsor
- Posts: 774
- Joined: Wed Jul 08, 2009 12:23 am
- Location: Melbourne Vic
Re: What did you do today? Cobba's rebuild
A pity someting that good looking gets hidden away.
It must be true, I read it on the internet.